 Skip to content
A bubble problem rarely shows up like a clean, obvious failure. More often, it sneaks in: one pale dot that only appears when your inspection light hits at a shallow angle. You tilt the panel a few degrees, and that dot turns into a cluster. You tilt again and it “winks.” That’s the moment bubble lcd stops being a minor cosmetic issue and becomes a process issue on your line.
The good news is OCA debubbling doesn’t have to be guesswork. If you lock a repeatable inspection method, load consistently, and run a stable recipe card for a full week before tuning, the debubble stage becomes predictable. That’s where a Jiutu bubble remover machine earns its keep: pressure + heat cycles after lamination, used as a controlled “finishing pass” to collapse trapped micro-air and help the adhesive layer settle.
This guide is written for technicians and production teams: fast classification, a clear QC standard (what “clean” means), copyable recipe cards, a debubble SOP, a troubleshooting table, and decision rules for salvage vs rework—plus the “common mistakes” and station checklist sections that production teams actually keep.
Bubble LCD bubble types and 30-second classification
If everything is called “a bubble,” troubleshooting becomes slow and expensive. A pepper-dot micro-bubble behaves differently from an edge tunnel, and both behave differently from haze. The fastest way to improve yield is to classify the defect before touching any settings.
The lamp method that works on real benches
You do not need a fancy booth. You need consistency.
-
Lamp type: a small, bright point-source LED inspection light (tight beam).
-
Distance: about 25–35 cm from the surface.
-
Tilt: hold the panel around 25–35° relative to the beam.
-
Sweep: slow “S” sweep across the full panel in 6–10 seconds.
-
Corner pause: stop at each corner for 2–4 seconds.
Why corners? Corners collect lint, corners reveal early edge sealing, and corners are where small defects become big returns.
The “three families” that cover most bubble LCD problems
Most bubble lcd complaints fall into one of these families:
-
Micro-bubbles (dots): pepper-like dots that sparkle or wink with angle changes.
-
Edge tunnels (ribbons): thin lines near the bezel that remain visible from many angles.
-
Haze (fog): cloudy patches that never resolve into dots, often worse after cooling.
Classification table: look → likely root cause → best first move
| Defect type | Under light it looks like… | Typical root cause | Best first move | Debubble-only success rate |
|---|---|---|---|---|
| Micro-bubbles | pepper dots / glitter wink | dust fibers, micro-texture, uneven wet-out | run baseline recipe card first | often high |
| Edge tunnel | ribbon near bezel | early edge sealing, vent path blocked | fix lamination contact direction | mixed |
| Island bubble | one big dome / blister | local pocket, snap-down clamp | decide salvage vs rework | mixed to low |
| Haze | fog patch / milky cloud | residue, moisture film, wipe streaks | re-clean + flash-off control | usually low |
| Scratch-line bubbles | dots aligned in a line | scratch channel traps air | surface correction + slow laydown | medium |
A fix guide must be blunt: haze is often not “trapped air,” so pressure cycles can waste time when the cleaning step is the real cause.
Bubble LCD QC standard: acceptable vs not acceptable
A lot of rework comes from fuzzy acceptance standards. One tech checks at 15 cm, another checks at 50 cm. One checks warm, another checks after cooling. That’s how a panel “passes” and then comes back.
QC setup (standardize these, don’t debate them)
Use the same setup every time:
-
Lamp distance: 25–35 cm
-
Tilt: 25–35°
-
Sweep time: 6–10 seconds per full sweep
-
Rest check: repeat the lamp check after 5–10 minutes at room temperature
-
Photo rule (optional but powerful): same angle, same distance, same lamp position for before/after photos
If your bubble lcd defects “return,” it’s often because the rest check was skipped, shortened, or done with a different setup.
Acceptable vs not acceptable (make it visual)
Acceptable (PASS):
-
No continuous ribbon/tunnel line along edges under the standard lamp check.
-
No dot clusters in critical viewing zones (center viewing area, logo area, camera window area).
-
No haze patch that remains visible across angle changes.
Not acceptable (FAIL):
-
Any edge tunnel ribbon traceable for more than a few centimeters.
-
Any haze patch that persists after rest (or grows after cooling).
-
Any island bubble that remains unchanged after baseline cycle.
Practical QC checklist (fits on one page)
-
Same lamp, same spot, same distance
-
Same tilt range
-
Immediate check + rest check
-
Record defect location (simple sketch or photo)
-
Don’t argue “it’s fine” without the standard setup
If the QC method is stable, process learning becomes fast.
Bubble LCD recipe cards: copyable defaults you can run for a week
A “window range” is not a recipe. A recipe card is copyable: your team can run it for a full week without edits so the line becomes stable first. Only then do you tune.
Below are starter recipe cards. You should still validate them for your material stack, but they’re structured exactly like a production floor wants: one card, one routine, one QC method.
Recipe Card A — micro-bubble focused (small modules)
Use case: phone-sized modules where micro-bubbles dominate.
Goal: clear dots without stressing delicate layers.
-
Temp: 50°C
-
Pressure: 0.55 MPa
-
Time: 16 min
-
Load: single layer, 5–10 mm spacing, similar thickness per batch
-
QC: immediate lamp check + 7-min rest check
If the bubble lcd issue is pepper dots, start with time discipline before chasing pressure.
Recipe Card B — tunnel rebound control (mid modules)
Use case: tablets/notebooks where edge tunnels come back after cooling.
Goal: reduce rebound while staying safe.
-
Temp: 55°C
-
Pressure: 0.60 MPa
-
Time: 20 min
-
Load: edge zones kept clear of contact points; trays must be flat
-
QC: mandatory rest check; photograph edge if tunnel was present
This card is intentionally “a bit slower.” It gives the adhesive time to settle instead of forcing everything with pressure.
Recipe Card C — large panels (flat loading discipline)
Use case: large glass panels and long vent paths.
Goal: even clearing across the surface.
-
Temp: 55°C
-
Pressure: 0.55 MPa
-
Time: 22 min
-
Load: single layer only; consistent rack support; no edge contact
-
QC: rest check extended to 10 min
Large panels magnify tray warp. With bubble lcd on big glass, loading discipline is half the recipe.
Recipe Card D — staged/segmented control (for mixed stacks)
Some debubble workflows benefit from staged ramps (gentle wet-out → collapse → stabilize). That’s the whole reason people like staged control for sensitive stacks. The segmented Jiutu unit supports staged pressure/temperature control—always confirm the exact max temperature and pressure for your specific model on the product page before pushing cycles.
Example staged card (practical starting shape):
-
Stage 1 (wet-out): 45°C, 0.35 MPa, 6 min
-
Stage 2 (collapse): 60°C, 0.65 MPa, 10 min
-
Stage 3 (stabilize): 55°C, 0.55 MPa, 6 min
-
Release: controlled release; then rest check
This staged shape often reduces “stress marks” compared with jumping straight to high pressure.
Bubble LCD debubble SOP: from pre-check to post-check
A recipe card only works if the SOP is stable. This SOP is written to remove randomness: the same actions, in the same order, with the same decision points.
1) Pre-check: classify before loading
-
Run the standard lamp sweep.
-
Classify defect family (dots / ribbon / fog).
-
Record location (quick sketch or photo).
If the same bubble lcd defect repeats in the same spot across units, don’t touch chamber settings yet—suspect fixtures, tray warp, wipe direction, or repeated contamination upstream.
2) Cleaning and flash-off: stop haze at the source
Haze is often residue, not air. Treat cleaning like a process step:
-
Cloth 1: wet wipe in straight strokes (no circles), overlap strokes
-
Cloth 2: dry wipe same direction
-
Flash-off: 30–60 seconds (longer if humidity is high or airflow is low)
If haze keeps showing up as bubble lcd “fog,” stop cycling and fix the cleaning + flash-off step first—otherwise you’re just baking the problem in.
3) Staging: stabilize temperature before contact
-
Stage OCA film and glass in the same room for 20–30 minutes
-
Avoid “cold film, warm glass” combinations
-
Keep film covered when not in use
Staging sounds slow until you realize how many micro seams come from snap-down behavior.
4) Loading rules: make the batch predictable
Inside the chamber, do this every time:
-
Single layer (no stacking)
-
Spacing: 5–10 mm between units
-
Group thickness: similar thickness per batch
-
Orientation: keep orientation consistent (connectors same direction)
Tray warp quick test: place the tray on a flat surface; if it rocks, fail it. If you can slide an A4 sheet under one corner easily while another corner stays tight, the tray is suspect.
A warped tray creates pressure gradients, which is how you get inconsistent bubble lcd results even when the recipe didn’t change.
5) Run the baseline recipe unchanged
Run one recipe card unchanged for a full week unless you have a clear safety concern. Stability first. After you get stable outcomes, tune one variable per batch.
Tuning rule: time first for dots; upstream fixes first for tunnels; cleaning fixes first for haze.
6) Post-check: immediate check + rest check
-
Immediate lamp sweep
-
Rest 5–10 minutes at room temperature
-
Repeat lamp sweep, especially edges
A bubble lcd edge tunnel that “comes back” after rest usually means the vent path is blocked or the edge sealed too early during lamination.
Bubble LCD troubleshooting tables: symptom → cause → action
This section is designed to stop “change everything and hope.” Use it like a map.
Quick decision tree (keep it simple)
If it’s fog (haze):
Re-clean → increase flash-off → verify streak-free → re-laminate if needed.
If it’s dots (micro-bubbles):
Run baseline recipe → increase time slightly → then adjust temperature → pressure last.
If it’s a ribbon (edge tunnel):
Inspect edge contamination + lamination contact direction first → only tune cycle after upstream is stable.
Troubleshooting table (bench-friendly)
| Symptom | Likely cause | Quick confirmation | Action | Prevention |
|---|---|---|---|---|
| Dot cluster around cutouts | fiber during peel / cutout contamination | dots form crescent around holes | improve cutout cleaning + baseline cycle | cover film; dedicated cutout wipe |
| Dots in a straight line | scratch channel | line follows scratch direction | surface correction; slow laydown | avoid dragging wipes |
| Ribbon on one edge | early edge sealing | ribbon aligns with contact direction | change laydown direction upstream | slower initial tack |
| Ribbon returns after rest | stress rebound / sealed vent | passes warm, fails cool | fix upstream edge geometry; keep rest check | cleaner edges; stable contact |
| Fog patch grows after cooling | residue/moisture | fog stays at all angles | change cleaning + flash-off | two-cloth method; dry air |
| Big dome bubble unchanged | sealed pocket | bubble same after baseline | decide rework | avoid snap-down clamping |
If you treat every symptom as “more pressure,” bubble lcd becomes a time sink. These actions keep learning clean.
Tuning table (one variable at a time)
| Defect family | Safest first tweak | Second tweak | Third tweak |
|---|---|---|---|
| Micro-bubbles | increase time slightly | raise temperature mildly | adjust pressure carefully |
| Edge tunnels | upstream contact fix | improve edge cleaning | cycle changes only last |
| Haze | cleaning + flash-off | wipe discipline | rework if persistent |
| Island bubbles | assess vent path | rework if sealed | don’t brute force |
Bubble LCD salvage vs rework: when the chamber can’t rescue it
A real fix guide includes a “stop trying” rule set. Otherwise, people run three cycles, four cycles, five cycles—and nobody learns anything.
The salvage rule for island bubbles
Island bubbles are only salvageable if there is still a vent path and adhesive flow. If the bubble edge forms a sealed ring, pressure can crush and heat can soften, but the trapped pocket may not migrate.
Fast judgment:
-
If it shrinks noticeably after baseline and doesn’t return after rest → salvage is likely.
-
If it stays tall/unchanged after baseline → rework is likely.
Salvage vs rework table
| Defect | Salvage likely when… | Rework likely when… |
|---|---|---|
| Island bubble | boundary not fully sealed; bubble shrinks with baseline | sealed ring; unchanged after baseline |
| Heavy haze | haze matches wipe streak and clears after re-clean | haze persists after re-clean + rest |
| Long edge tunnel | faint tunnel shrinks and stays gone after rest | repeats in same location; returns after rest |
| Micro-bubbles | dots reduce with time extension | dots unchanged even after time extension |
When bubble lcd defects are unchanged after a stable baseline cycle, stop and go upstream.
Rework strategy that saves cost (not just pride)
Rework is often cheaper when:
-
haze persists after re-clean
-
a tunnel returns after upstream contact behavior is already corrected
-
a sealed island bubble doesn’t change after baseline
A fast, disciplined rework beats five “hope cycles.”
Bubble LCD common mistakes and “flip points” (the real yield killers)
This section is the “shop-floor truth.” These are the mistakes that quietly flip a good recipe into a bad day.
Mistake 1: Overloading the chamber (panels touching)
If two panels touch, pressure paths change. Heat distribution changes. Air migration becomes unpredictable. One unit clears and the next one doesn’t—then everyone starts blaming the OCA batch or the machine.
Fix: set a physical spacing guide (5–10 mm). Treat spacing as part of the recipe.
Mistake 2: Stacking to “save space”
Stacking is tempting. It is also one of the easiest ways to create inconsistent bubble lcd outcomes because the top piece steals pressure, the bottom piece gets uneven heat, and the edges become stress points.
Fix: one layer only. If capacity is tight, run more batches, not stacked batches.
Mistake 3: Tray warp that nobody checks
A tray can warp slowly and nobody notices until edge tunnels spike. You can have a perfect recipe and still fail because the tray creates pressure gradients.
Fix: do the “rock test” once per shift. If it rocks, pull it.
Mistake 4: Reusing wipes (fiber contamination)
A wipe can look “fine” and still shed fibers. Fibers create micro-bubble constellations—especially around cutouts.
Fix: treat wipes like consumables. One wipe per stage. Don’t stretch it.
Mistake 5: “One batch, three parameter changes”
The fastest way to learn nothing is to change temperature, pressure, and time in the same batch. When the result changes, you can’t explain why.
Fix: change one variable per batch, write it down, and keep the test controlled.
Mistake 6: Skipping the rest check (edge tunnels lying to you)
Some edge tunnels look gone when warm, then reappear after cooling. Skipping rest check creates “pass now, fail later.”
Fix: rest check is mandatory for any bubble lcd edge complaint.
Mistake 7: Running haze like it’s air
Haze is often residue or moisture film. Running haze through pressure cycles wastes time and sometimes spreads the haze.
Fix: stop, re-clean, enforce flash-off. If it persists, consider rework.
Mistake 8: Dirty air supply (water in the line)
Pressure stability matters. Water in the air line creates drift and introduces moisture risk.
Fix: use a water trap; drain it on schedule; verify regulator stability.
Mistake 9: Changing material and process on the same day
New OCA batch + new cleaner + new recipe = chaos. When yield flips, you can’t point to a cause.
Fix: isolate changes. If you must change materials, keep the recipe stable for 1–2 days.
Mistake 10: “Fixing tunnels” only in the debubble stage
Edge tunnels are usually born in lamination contact behavior and edge contamination. Debubble can shrink them, but it rarely solves the root geometry if the vent path is sealed.
Fix: treat tunnels as an upstream issue first. Debubble is the finisher, not the creator.
These mistakes are why bubble lcd feels “random” on many lines. Remove the randomness, and the recipe starts behaving.
Bubble LCD station checklist: layout, tools, and daily control points
If you want stable output, build a station that supports stable habits.
Recommended station layout (simple flow)
-
Cleaning zone (with covered wipes, trash bin, lint control)
-
Lamination zone (film covered, staging tray, controlled laydown space)
-
Debubble zone (flat rack, spacing guide, log sheet)
-
Inspection zone (fixed lamp position, repeatable angle, photo reference)
The goal is to reduce unnecessary touches. Every extra touch is another chance for dust.
Tools and consumables checklist (the “don’t start without this” list)
-
Point-source LED inspection lamp
-
Covered staging trays for film and glass
-
Two-cloth cleaning setup (wet cloth + dry cloth)
-
Nitrile gloves (or equivalent)
-
Anti-static support (ionizer preferred on dry days)
-
Flat loading trays / rack with spacing markers
-
Air compressor + regulator + water trap
-
Hygrometer (basic, near the bench)
-
Batch log sheet (paper or digital)
-
Camera/phone photo rule for repeat defects
This is not glamorous, but it’s what reduces bubble lcd variability.
Daily control points (5 minutes that saves hours)
At shift start:
-
Check tray flatness (rock test)
-
Drain water trap (if needed)
-
Verify regulator setpoint holds steady
-
Confirm lamp distance and lamp position are unchanged
-
Confirm film is covered and staged in the same room
At shift end:
-
Quick wipe-down of racks and tray storage
-
Remove any worn/warped trays
-
Note any recurring defect locations (pattern tracking)
Batch log sheet (simple and powerful)
Record these every batch:
-
Recipe card used (A/B/C/D)
-
Load density (number of units) + spacing confirmed
-
Defect family before cycle (dots/ribbon/fog)
-
Immediate result (pass/fail + photo if fail)
-
Rest-check result (pass/fail + photo if fail)
-
One change, if any (time/temp/pressure—only one)
If you do this for two weeks, your bubble lcd issues stop being mysterious and start being data.
Bubble LCD large panels: what changes when the glass gets big
Large panels change everything about vent paths and pressure uniformity. A small mistake on a phone module becomes a visible ribbon on big glass.
Vent paths get long, so edge sealing is more dangerous
Early edge sealing traps long tunnels. Controlled laydown is critical: slow initial contact, steady pressure, and no snap-down at corners.
Tray flatness becomes a quality tool
On big glass, a tiny warp creates a pressure gradient you can see. That’s why big-panel bubble lcd work demands flat loading discipline.
Why a large chamber can help for batching
The large-sized Jiutu unit lists a 600×900 mm inner chamber and a 0.4–0.6 MPa work pressure range. Those constraints make sense for flat loading and batching—if you keep single-layer loading and spacing discipline.
Image (large chamber unit):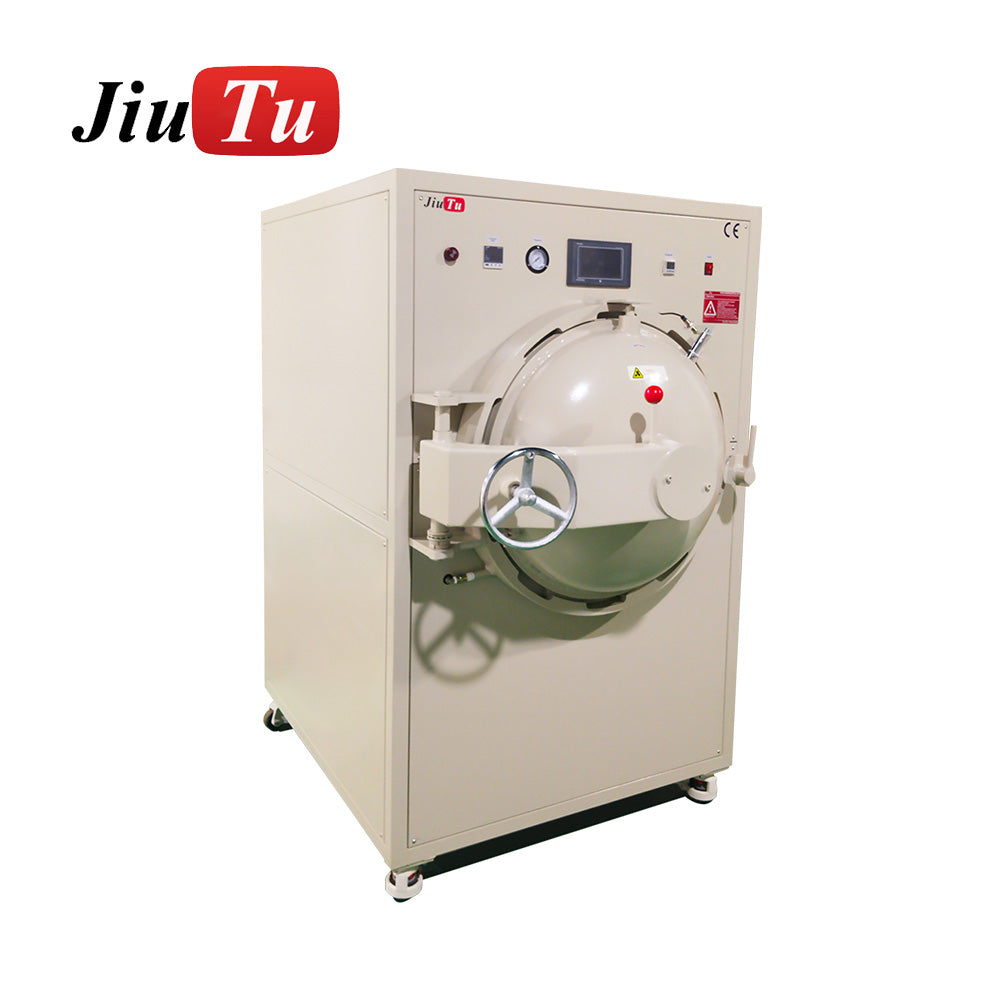
Image (open chamber / rack view):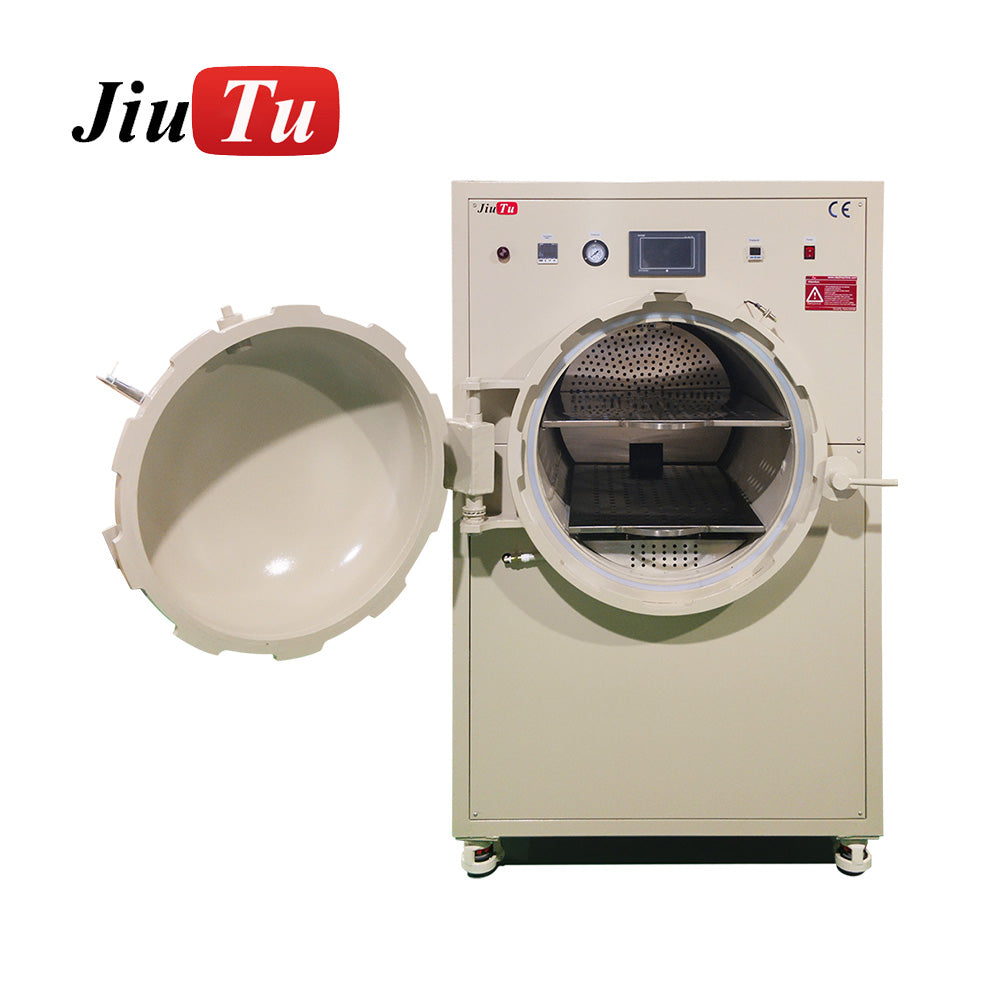
Bubble LCD air supply and environment control
Debubbling runs on pressure. Pressure runs on air supply. If air is wet or unstable, results drift.
Air supply: dryness and stability
-
Use a water trap / filter on the line
-
Drain it on a schedule (don’t wait for problems)
-
Verify regulator stability (setpoint should not drift)
The segmented Jiutu unit listing notes Air Compressor Needed and Vacuum Pump No Need, which simplifies utilities, but makes air quality more important for stable bubble lcd outcomes.
Environment: humidity + static = dust + wet-out changes
-
Use a basic hygrometer near the bench
-
Cover film when not in use
-
Use ionization on dry days
-
Stage film and glass in the same room
None of this is fancy—but it’s how you make bubble lcd defects stop feeling random
Bubble LCD selecting the right Jiutu bubble remover setup
Choose based on your work reality: panel size, volume, and how mixed your stacks are.
Option 1: Large chamber, flat batching
If you do larger-format work or want flat, consistent batching, look at the Jiutu large-chamber bubble remover machine. It lists 0.4–0.6 MPa work pressure and 600×900 mm chamber size with adjustable temperature/time/pressure.
This option shines when:
-
product mix is stable
-
racks and spacing can be standardized
-
you prioritize flat loading consistency
Option 2: Segmented/staged control for mixed stacks
If you have frequent stack changes or want staged ramps, look at the Jiutu segmented/staged bubble remover machine. It’s described with segmented adjustment, max 80°C, max 0.8 MPa, and chamber 600 mm diameter × 900 mm depth, and notes “Vacuum Pump No Need.”
This option fits when:
-
you run mixed formats and mixed thickness
-
you need gentler ramps to reduce stress
-
you want recipes that are easier to tune without “shock changes”
Image (segmented/staged unit):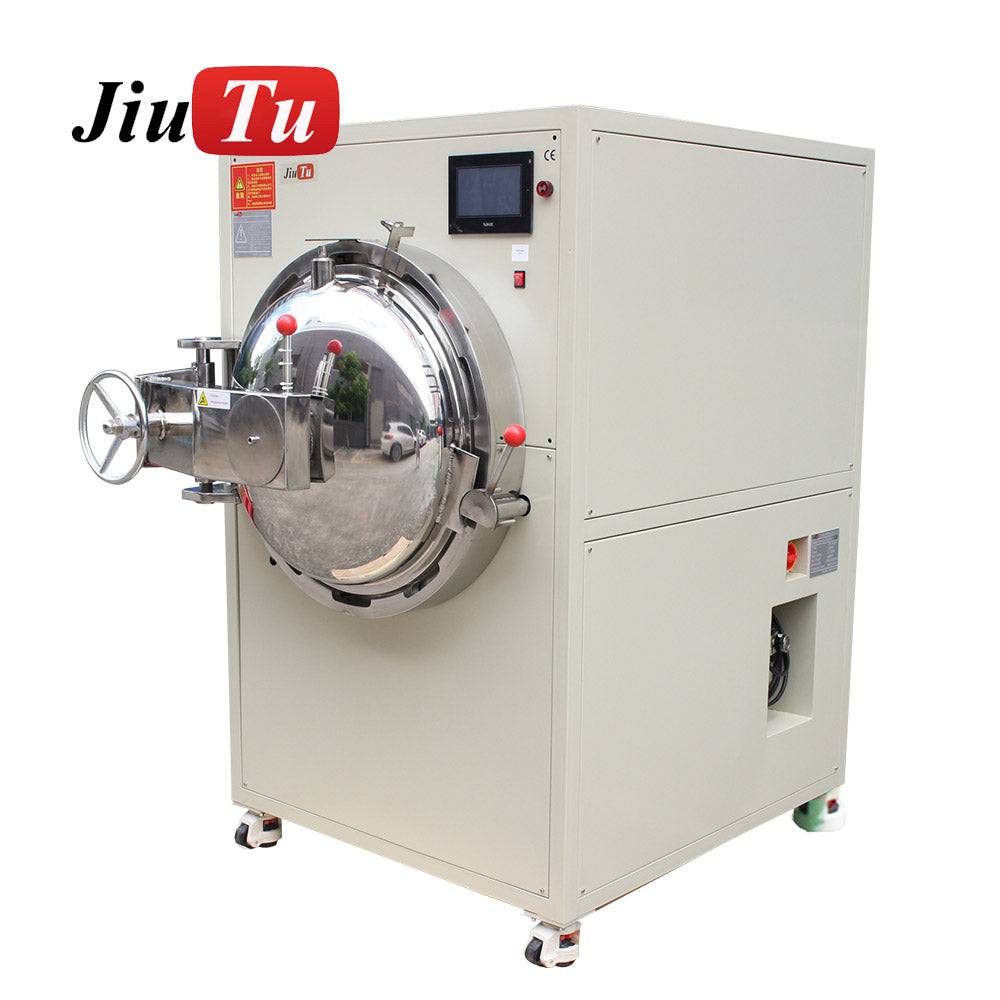
Image (front view / product visual):
Build your internal linking “hub”
If you want the cleanest station planning view (and the cleanest internal linking structure for SEO), use the Optical Bonding Machine collection as your hub page.
Bubble LCD maintenance rhythm: preventing “sudden bad days”
When a stable recipe suddenly becomes unstable, suspect drift: leaks, regulator issues, rack warp, or door seal wear.
Drift checklist (fast)
-
Set pressure and watch for slow drops
-
Check joints for leaks
-
Verify machine is level, casters locked
-
Check rack/tray flatness
-
Confirm air line water trap is working
Maintenance schedule (practical rhythm)
The segmented unit description includes periodic maintenance guidance such as checks every 15 working days (circuits/air circuit), fan checks, and lubrication on moving parts.
A simple rhythm:
-
Every 15 working days: air joints + circuits + fan + lubrication where required
-
Weekly: drain water trap; check regulator stability; tray warp check
-
Monthly: inspect door seal condition and latch behavior
Maintenance is how you keep bubble lcd recipes stable long-term.
FAQ
Why does bubble lcd sometimes look “fixed” warm, then fail after cooling?
Edge tunnels and stress rebound can hide when warm. The rest check reveals the truth. That’s why rest checks are mandatory for edge complaints.
Is time usually safer than pressure?
For micro-bubbles, yes—time is often the safest first tweak. Pressure can help, but it also increases stress risk on delicate stacks.
Why does haze get worse after a cycle?
Pressure + warmth can spread residue films. Haze is usually a cleaning/flash-off problem, not an air collapse problem.
Do I always need a vacuum pump for debubbling?
The segmented unit listing notes “Vacuum Pump No Need,” focusing on pressure/heat cycles with an air compressor.
When should I stop cycling and rework instead?
When the defect is unchanged after a stable baseline recipe and rest check—especially sealed island bubbles or persistent haze.
Wrap-up and next actions
A real fix guide makes results predictable. If you apply a stable QC standard, run copyable recipe cards for a full week, and treat loading as part of the recipe, bubble lcd issues stop being random.
Next steps (run these exactly as written for one week):
-
Pick one recipe card and run it unchanged for a week (log every batch).
-
Lock the QC standard (lamp distance, tilt, sweep time, plus rest check).
-
Fix the common mistakes first (tray flatness, spacing, wipes, one-change-per-batch).
And if you want the deeper upstream context (how lamination quality sets up debubble success), go back to the internal guide here: bubble lcd.