A clean shipment test is not paperwork. It is the last quiet moment before a machine enters real repair work, where one small edge bubble can slow an entire bench.
On a busy repair bench, the first failed screen rarely looks dramatic. Instead, a small corner bubble appears after bubble removal. Then another screen shows a faint pressure mark near the edge. After that, the team starts checking film storage, glass cleaning, pressure settings, and operator handling all at once.
That is why a vacuum laminating machine should go through a practical acceptance test before shipment. The test should not only confirm that the power turns on. It should show how the machine behaves with real loading, real settings, real pressure, and real sample inspection.
Also, the test should feel close to daily work. A repair shop may handle phone LCD screens in the morning and tablet glass after lunch. A refurbishing team may run the same model for half a day. An industrial display project may only process a few panels, but each panel can be expensive. Therefore, the acceptance test must check the working rhythm, not only the specification sheet.
 View Vacuum Laminating Machine
Why the Acceptance Test Matters Before Shipment
Before a machine is packed, the workshop still has one advantage: everything is visible. The platform can be inspected under light. The lid can be opened and closed several times. The vacuum hold can be watched quietly for a few minutes. Once the crate leaves, every missed detail becomes slower to solve.
However, many shipment checks stop too early. A photo of the interface, a quick power-on video, and one clean sample may look reassuring. Still, that does not prove the machine can repeat the same result after three cycles, after a larger panel, or after a change in film type.
A good acceptance test answers a more useful question: will this machine help the first week of production feel controlled? If the answer is unclear, the test is not finished. In screen repair, uncertainty costs more than time. It uses film, glass, labor, and patience.
For that reason, the test should record what happened. It should show the settings, sample material, loading method, result photos, and packing condition. Later, when the machine arrives, those records give the receiving team a starting point instead of a guessing game.
Vacuum Laminating Machine Key Parameters Explained in Real Work Language
Parameters matter, but they should not read like a catalog. In real lamination work, each number connects to a visible result on the screen. Vacuum affects trapped air. Pressure affects contact and marks. Heat affects adhesive flow. Alignment affects whether a clean panel still looks professional after bonding.
Vacuum Level: The First Sign of Process Stability
Vacuum level shows whether air can leave the bonding area before pressure does its work. If the chamber reaches the target value slowly, or if the value drops during hold, the problem may sit in the gasket, valve, pipe connection, or pump path. Meanwhile, the sample may still look acceptable once, which makes the issue easy to miss.
A better test watches the chamber for several minutes. First, record how long it takes to reach the target. Then, hold the value and watch whether it stays steady. After that, repeat the same test with a dummy panel inside. The second run often reveals loading-related leaks that an empty chamber does not show.
In daily repair work, stable vacuum gives the operator a calmer process. The film can settle, the panel can stay flat, and bubble removal does not have to fight defects that began earlier.
Pressure: Strong Enough to Bond, Gentle Enough to Protect
Pressure should not be judged by force alone. A stronger press is not always a better press. For thin OLED, refurbished glass, or edge models, excessive pressure can leave marks that only appear under bright inspection light. Therefore, pressure should rise smoothly and hold without sudden jumps.
During acceptance, dummy glass should be used before good parts. This simple step protects real materials while confirming the press action. Then, a real sample can show whether the settings create edge lift, corner stress, or uneven contact.
Also, the pressure gauge should match the machine movement. If the number looks steady but one side of the plate lands harder, the sample will tell the truth. Low-angle light is useful here because pressure marks often hide from a straight front view.
Heat: Less Drama, More Uniformity
Heat helps adhesive flow, but uneven heat creates uneven bonding. On small phone screens, a small difference may not ruin every part. However, on tablet glass or industrial display panels, one weak corner can turn into a rework problem.
The acceptance test should check how the platform warms up and how it recovers after the lid opens. A platform that reaches temperature once but struggles to recover during repeated cycles can slow batch work. Meanwhile, a corner that stays cooler than the center may show weak edge bonding.
For practical testing, the center and four corners deserve attention. If a temperature tool is available, use it. If not, at least record warm-up time, displayed temperature, and sample result under the same setting.
Alignment: Clean Lamination Still Fails When Placement Drifts
Alignment mistakes are frustrating because the panel may have no bubbles at all. The glass can bond cleanly, yet the border looks wrong. In phone repair, a mold may control most of the risk. In tablet, automotive, or industrial display work, placement often needs more careful checking.
Therefore, acceptance should include repeated placement, not only one careful sample. Place the same material three to five times, then check whether the result stays consistent. If the operator must correct the position by eye every time, the fixture or alignment method needs attention.
For work that needs tighter positioning, the CCD vacuum laminating machine is the stronger direction. It helps check visual reference points before bonding, which is useful when screen value is high or tolerance is narrow.
 Check Product Details
Recommended Test Range by Screen Type
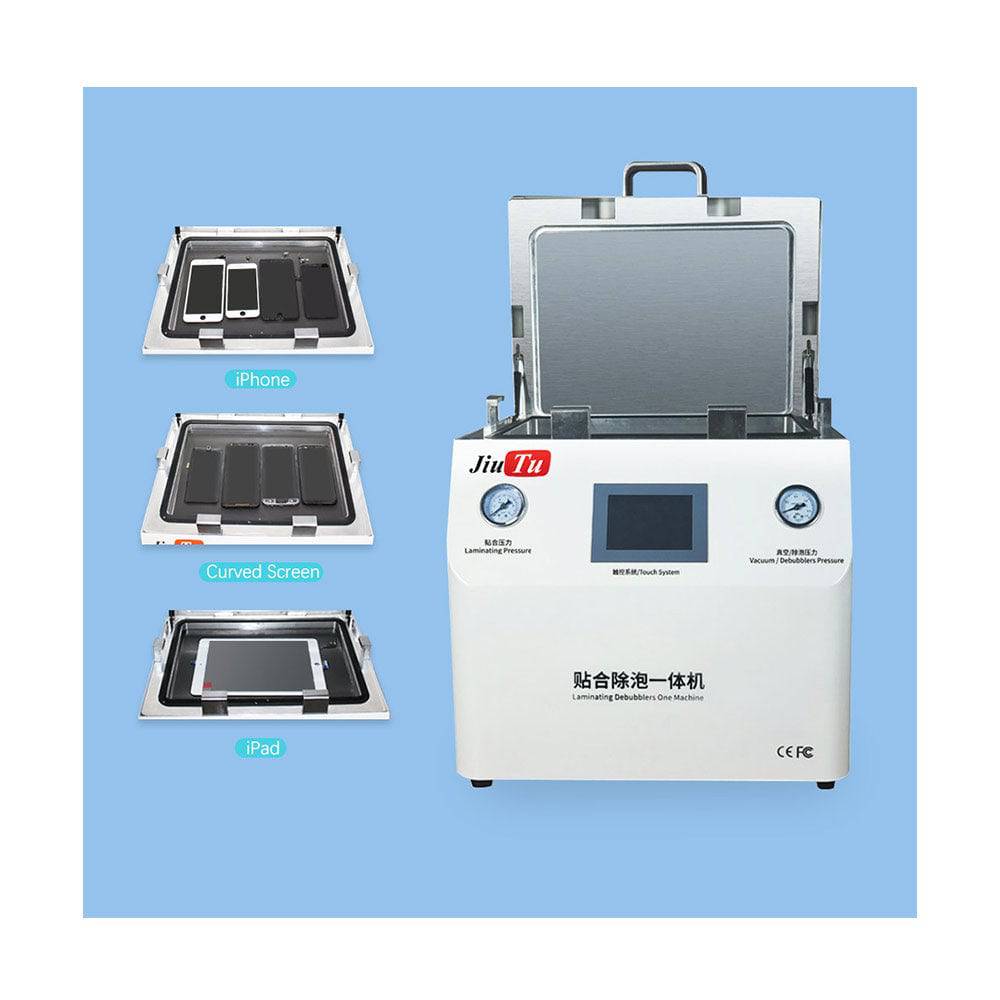
A vacuum laminating machine acceptance test should match the actual work. Testing only one phone screen does not prove tablet readiness. Testing only a large dummy panel does not prove daily phone-screen rhythm. Therefore, the test range should follow the real screen mix.
For phone LCD and OLED work, the priority is repeatable loading, clean pressure, and stable bubble control. For tablets and iPad-style repairs, the priority shifts toward platform space and corner bonding. For industrial displays, the test should focus on alignment, support, and documentation.
| Work Type | Main Test Focus | Good Sign | Warning Sign |
|---|---|---|---|
| Phone LCD and OLED repair | Vacuum hold, mold fit, pressure response | Three similar samples with clean edges | One good sample followed by random corner bubbles |
| Tablet and iPad repair | Working area, corner pressure, loading space | Panel loads without touching adhesive area | Panel sits too close to the platform edge |
| Industrial display modules | Alignment repeatability and fixture support | Same placement after several trials | Slight drift becomes visible on large glass |
| CCD alignment projects | Camera recognition and repeated mark reading | Reference points remain stable under light | Camera loses marks when glass reflects |
| Mixed repair bench | Fast setup and simple cleaning | Different sizes can be staged calmly | Operators keep changing settings by memory |
Phone Repair Range
For phone repair, the test should include flat LCD, edge OLED, and at least one screen size that appears often in daily work. The machine should not make the operator fight the setup. Loading should feel steady, and the screen should leave the chamber without new marks.
Meanwhile, repeatability matters more than one impressive sample. If three samples look similar under bright light, the process is safer. If the first sample looks clean but the second needs pressure changes, the acceptance test should slow down and find the reason.
Tablet and Mid-Size Range
Tablet work needs room. A large glass sheet exposes more adhesive, catches more dust, and gives the operator less room for correction. Therefore, the dry loading test should use a real-size dummy panel before any bonding sample.
Also, corner inspection should not be skipped. Many tablet defects appear near the edge because the panel lifted slightly during loading or because pressure did not land evenly. A simple angled light check often catches this faster than a front-view photo.
Industrial and Large-Format Range
Industrial panels bring a different kind of pressure. The daily quantity may be lower, but the cost of a failed panel is higher. A display for a kiosk, control cabinet, vehicle screen, or terminal device needs stable optical clarity and placement.
For this work, a larger platform such as the 21 inch OCA film laminator can make sense when phone repair also includes iPad, tablet, or larger LCD screen lamination. The acceptance test should still confirm external pump or air supply needs before packing.
 View 21 Inch OCA Film Laminator
Acceptance Steps Before Shipment
A strong acceptance process is not complicated. It is steady. Each step answers one practical question before the machine goes into the crate. If a result looks unclear, the test should pause instead of moving forward too quickly.
Step 1: Confirm the Exact Configuration
Before power-on, the team should confirm model name, voltage, plug type, working area, accessory list, molds, spare parts, and whether an external vacuum pump or air compressor is needed. This is simple work, but it prevents slow installation problems later.
A clear photo of the machine label and accessories should be included in the acceptance file. Also, if any item must be prepared locally, it should be written down. A missing connector can stop installation for a full day, even when the machine itself is fine.
Step 2: Inspect the Platform and Chamber
Next, inspect the platform under light. Look for adhesive residue, dust, uneven pads, loose screws, or small burrs. Then, check the chamber gasket. A twisted gasket may look minor in a photo, but it can cause slow vacuum loss during the hold stage.
The lid should open and close smoothly. Meanwhile, the platform should not scrape, tilt, or feel unstable. A short video of this movement is useful because it shows mechanical behavior better than a still image.
Step 3: Power On and Check the Interface
After the mechanical inspection, power on the machine and check the interface. Buttons, touch response, language display, stored settings, and alarms should all work normally. If recipe settings are saved, photograph them before any changes.
This step helps after arrival. A team can compare the factory setting with the receiving setting instead of relying on memory. Also, a screenshot makes technical support much easier if the first sample needs adjustment.
Step 4: Run an Empty Vacuum Test
Then, run the chamber empty. Record how long it takes to reach the target vacuum level. After that, hold the value and watch whether it stays stable. A fast drop suggests a leak or connection issue.
However, the empty test is only the first layer. The same test should run again with a dummy panel or fixture inside. Sometimes the seal behaves differently after loading, especially when the material changes how the chamber closes.
Step 5: Check Heat and Recovery
Set a practical working temperature and wait until the platform stabilizes. Record warm-up time and displayed value. If a surface temperature tool is available, check the center and corners.
After that, open the lid for a short period and close it again. Watch how the temperature recovers. This small test feels ordinary, but it reflects real production because operators open and close the chamber many times during a shift.
Step 6: Test Pressure With Dummy Material
Before a real screen enters the machine, use dummy glass or test material. The pressure should rise smoothly, hold steadily, and release without sudden movement. Meanwhile, the platform should not show one side pressing earlier than the other.
This is where many hidden issues appear. A machine may look clean from the outside, but a tilted pressure action can create repeated marks. Testing dummy material first keeps good parts out of unnecessary risk.
Step 7: Run a Real Handling Dry Test
A dry handling test means loading, positioning, closing, releasing, and unloading without bonding. It may seem slow, but it catches bench-level problems early. For example, a tablet panel may touch the edge of the opening, or a fixture may block a normal hand position.
The test should use the smallest and largest common panel sizes. If only one size is tested, the process may hide the exact problem that appears after delivery. Handling comfort affects quality because rushed hands create dust, shift, and fingerprints.
Step 8: Run Sample Lamination
Now the actual sample can be tested. Clean the glass and film the same way the repair team would. Then, record the settings before running the cycle. After bonding, inspect the sample under front light and angled light.
Look for bubbles, dust, edge lift, cloudy areas, pressure marks, glass shift, and surface stress. Also, inspect the edge after a short rest. Some defects do not appear in the first minute, especially if the adhesive is still settling.
One clean sample is good, but repeated clean samples are better. A practical shipment test should run at least three cycles for common repair work. For high-value display modules, more placement checks may be needed before approval.
Step 9: Verify CCD Alignment When Needed
For CCD alignment systems, the test should include mark recognition, camera clarity, lighting, and repeated placement. Glass reflection can confuse the camera. Therefore, the test material should be close to the real panel, not only a perfect white sample board.
A strong test places the same panel several times and checks whether the system returns a stable position. If the result drifts, the issue may be fixture movement, camera focus, light angle, or software threshold. It should be corrected before packing.
Step 10: Review Packing Before the Crate Closes
After testing, the machine should be cleaned and returned to shipping condition. Moving parts should be protected, accessories should be packed separately, and the platform should not carry loose tools or film pieces. Also, the packing photos should show the machine before wrapping, after wrapping, inside the crate, and after sealing.
This final step protects both the machine and the installation plan. If the crate arrives with damage, the packing record helps identify what changed during transport.
 View CCD Vacuum Laminating Machine
Vacuum Lamination Machine Checklist Before Packing
This checklist is designed for real shipment review. It helps keep the acceptance process clear, short, and repeatable.
- Confirm model name, voltage, and plug type.
- Check working area and intended screen size range.
- Inspect chamber gasket and platform surface.
- Photograph accessories, molds, tools, and spare parts.
- Power on the interface and record startup status.
- Save or photograph default process settings.
- Run empty vacuum pull and vacuum hold tests.
- Repeat vacuum test with dummy material loaded.
- Check pressure rise, holding behavior, and release.
- Record heat stabilization and recovery behavior.
- Run dry loading with real-size panels.
- Complete at least three sample lamination cycles.
- Inspect samples under straight and angled light.
- Check CCD recognition if alignment is required.
- Test emergency stop and key safety alarms.
- Confirm external pump or air compressor needs.
- Clean the chamber before packing.
- Photograph final crate condition before shipment.
How to Judge Whether the Machine Fits the Workflow
Acceptance should not only ask whether the machine works. It should ask whether the machine fits the work. In daily repair work, a vacuum laminating machine should make loading, bonding, release, and inspection feel repeatable, not stressful. A compact system may be excellent for phone repair but crowded for tablet glass. A larger system may support bigger panels but need more space, air supply, and handling discipline.
Match the Platform to the Largest Regular Job
The largest regular job should guide platform judgment. Not the rare biggest panel in the catalog, and not the easiest daily phone model. The useful question is simple: what screen size appears often enough to affect daily rhythm?
If tablet work appears every week, the acceptance test should include tablet-size handling. If the repair flow is almost all phone screens, compact loading and faster cleaning may matter more. The right platform makes the normal process calmer.
Match Alignment Control to Material Value
Manual alignment can work well for common phone screens when molds are strong and tolerance is forgiving. However, larger displays and industrial modules can turn small position errors into visible defects. In that case, CCD support can reduce repeated guessing.
This is a firm point. Adding complexity without need slows training. Avoiding alignment control where it is needed creates scrap. The acceptance test should prove that the selected control level matches the real panel value.
Match Accessories to the Installation Site
Accessories decide whether installation starts smoothly. Pipes, connectors, molds, spare gaskets, filters, manuals, and training files all matter. A missing hose can make a good machine look unready.
Therefore, the acceptance report should list what ships with the machine and what must be prepared on site. If an air compressor or external vacuum pump is required, it should be clear before the crate moves.
Match the Process to Operator Habits
Daily lamination is physical work. The operator lifts the glass, removes the liner, checks dust, lowers the panel, closes the chamber, waits, opens, and inspects. If any motion feels awkward, defects become more likely.
A good machine should make the correct action easier. The lid should not fight the hand. The fixture should not block the panel. The platform should give enough room to place material without touching adhesive. These details rarely appear in a product headline, but they affect every shift.
Common Mistakes That Make Shipment Tests Weak
Most weak acceptance tests fail for the same reason: the test is rushed. The machine is ready, the crate is waiting, and everyone wants to move the order forward. However, a rushed test moves risk from the factory floor to the repair bench.
Mistake 1: Treating Power-On as Proof
A working screen does not prove a working lamination process. The interface can start normally while the chamber leaks. A button can respond while pressure action feels uneven. Therefore, power-on is only the opening check.
The material path must be tested. That means loading, vacuum, pressure, heat, sample bonding, inspection, and release. If the test does not touch the material path, it does not say enough.
Mistake 2: Running Only One Easy Sample
One easy sample can hide real behavior. It may sit in the center, use perfect material, and avoid the edge condition that normally causes trouble. Then, after delivery, the first difficult screen reveals the issue.
Instead, the test should include repeated cycles and at least one realistic screen size. If the same result appears several times, confidence becomes more reasonable. If every run needs a new adjustment, the process is not ready.
Mistake 3: Ignoring the Bench Layout
A machine can pass the factory test and still create awkward daily work. If the panel must move across a dusty table before loading, the defect may not come from the machine at all. If the operator has to reach over another tool, alignment becomes less stable.
That is why the acceptance file should include simple operating notes. Loading order, cleaning sequence, and tool placement can be explained in a few lines. Those few lines can prevent many first-week mistakes.
Mistake 4: Changing Too Many Settings at Once
When a sample shows bubbles or marks, changing pressure, heat, and time together creates confusion. The next sample may look better, but nobody knows which change helped. Later, the result becomes hard to repeat.
A cleaner method changes one setting at a time. Record the result. Then change the next setting only if needed. This habit feels slower, but it saves film and avoids false conclusions.
Mistake 5: Not Recording the Final Recipe
A sample photo without settings is not enough. The report should show vacuum value, pressure, temperature, cycle time, hold time, material type, and inspection note. Otherwise, the sample cannot guide installation.
The best shipment file tells a clear story: this material was loaded this way, these settings were used, this result appeared, and this packing method was completed. That story is useful when the machine arrives.
Practical Scenarios and Selection Thinking
A shipment test becomes easier when the work scene is clear. The same machine may serve different repair flows, but the acceptance focus should change with the job. Phone screens, tablet glass, automotive displays, and industrial modules do not create the same kind of risk.
Scenario 1: Phone LCD and OLED Refurbishment
In phone repair, the work is small but unforgiving. A dust point near the center becomes obvious when the screen lights up. A slight edge bubble can return after a short rest. Therefore, the test should focus on repeatable pressure, clean mold fit, and quick chamber cleaning.
A compact machine is often easier to fit into this rhythm. The operator can clean, place, laminate, inspect, and move the panel to the next step without walking across the room. That shorter movement reduces dust exposure and keeps the bench calmer.
Scenario 2: Tablet and iPad-Style Repair
Tablet work feels different as soon as the glass is lifted. The panel is wider, the adhesive area is more exposed, and the hand movement must slow down. Because of that, the acceptance test should not judge tablet readiness from a phone-sized sample.
A real-size dummy panel should be loaded several times. The test should show whether the platform gives enough space for clean placement. Also, the corners should be inspected after bonding because this is where tablet defects often appear first.
Scenario 3: Industrial Display Modules
Industrial display work usually cares less about speed and more about repeatability. A panel may go into a factory HMI, terminal machine, vehicle display, medical screen, or kiosk. In those places, haze, edge lift, and alignment shift are not small cosmetic issues.
For this situation, the acceptance test should include fixture support, panel drawing, alignment reference, and sample record. If the real panel is not available, a marked dummy glass sheet can still reveal platform space and positioning behavior.
Scenario 4: Automotive and Curved Display Work
Automotive screens often face strong light, reflections, and curved design. A mark that looks minor on the bench may become visible in a vehicle cabin. Therefore, sample inspection should include low-angle light and reflection checks.
Also, curved or 3D structures should not be forced into flat-panel thinking. Fixture support matters. Pressure should land in a controlled way. If the fixture is still being designed, the acceptance report should say so clearly.
FAQ
What should a vacuum laminating machine acceptance test include?
It should include configuration confirmation, platform inspection, power-on review, vacuum pull, vacuum hold, pressure action, heat stability, dry loading, sample lamination, safety checks, and packing photos. Also, the final sample settings should be recorded so the result can be repeated after installation.
How many sample cycles should be tested before shipment?
For common phone repair work, three sample cycles are a practical minimum. For tablet, automotive, or industrial display work, more dry placement checks and at least one real-size sample are safer. The goal is not a large number. The goal is repeatable behavior.
Why can a sample pass while the chamber still has a vacuum issue?
One sample can pass by luck, especially if the material is easy and placed in the best position. A vacuum hold test checks the chamber itself. If the value drops too fast, later samples may show bubbles even though the first one looked clean.
When is CCD alignment worth adding?
CCD alignment is worth considering when the panel has tight visual tolerance, a narrow border, higher material value, larger glass, or repeated industrial batches. For simple phone repair with reliable molds, manual alignment may be enough. For high-value display modules, CCD support can reduce placement variation.
What records should be sent before shipment?
The shipment file should include label photos, accessory photos, interface settings, vacuum and pressure test notes, heat check notes, sample photos, sample settings, video clips, packing photos, and crate condition. This record makes first-week setup easier and reduces confusion if support is needed.
Shipment Readiness Starts Before the Crate Closes
A vacuum laminating machine is not ready because it looks clean in a photo. It is ready when vacuum holds, pressure moves smoothly, heat stays stable, samples repeat, alignment makes sense, and the packing record is clear.
For the next vacuum laminating machine plan, prepare three details before contacting Jiutu: regular screen size range, film or glass type, and current defect photos. With those details, Jiutu can suggest a quotation, sample machine direction, or setup plan that fits phone repair, tablet refurbishment, CCD alignment, or industrial display lamination.