 Skip to content
On the bench, a laminated panel can look “fine.” Under backlight, tiny defects suddenly show up—pepper dots, faint haze, edge crescents that weren’t obvious five minutes ago. That gap between bench OK and backlight clean is where process discipline pays for itself. In particular, a bubble remover machine is the step that turns decent wet-out into repeatable clarity across shifts, operators, and mixed screen structures.
This is written like shop SOP, not like a brochure. You’ll see what common bubble patterns usually mean, how post-lamination bubble removal works (and what it cannot fix), how to pair equipment without wasting budget, what to check on day one, and how to lock results with batch logging. The biggest goal is simple: stop “tuning forever,” start fixing root causes.
If you’re building or upgrading a station, a good shortcut is to start by browsing the bubble remover machine collection, then back-calculate utilities and layout from the lane you actually run (phones, mid-size, or large format). That one step prevents a lot of mis-buying.
Why bubbles show up after OCA lamination
Bubbles aren’t random. They look random when the process is drifting, but they usually follow repeatable patterns. The fastest way to become “stable under backlight” is to stop treating bubbles as one problem and start treating them as types that point upstream.
The four bubble families you’ll see most often:
Microbubbles (pepper dots)
They look like fine speckling under backlight. They often show up after handling—even if cleaning was “done.”
If pepper dots suddenly spike on a new shift, don’t touch the chamber first—check peel speed, ionization, and wipe lint.
Most common causes on the floor:
-
Static attraction during film handling (dry air + fast peel = dust magnet)
-
Lint from wipes, gloves, sleeves, bench mats
-
Airflow that blows bench dust (instead of filtered air)
-
Peel liner “snap” that flicks particles into the adhesive
Fast way to confirm:
-
If you can see a fixed dot at the center of a star shape under angled light, it’s likely particle-anchored.
Wet-out haze (cloudy patches, milky zones)
This is the “looks okay on bench, shows haze under backlight” defect. It often correlates with uneven wet-out, plate issues, or temperature inconsistency.
Most common causes on the floor:
-
Cold adhesive flow on thicker stacks or in colder rooms
-
Plate not flat / plate not clean / plate has wear marks
-
Vacuum wet-out time cut too short (looks bonded but not fully flowed)
-
Uneven support (edges supported, center floating—or the reverse)
Fast way to confirm:
-
Haze that mirrors tray contact zones often points to plates or layout, not chamber settings.
Edge crescents / edge lines
These are classic “late defects.” A panel passes a quick check, then comes back with edge bubbles after assembly or handling.
Most common causes on the floor:
-
Weak perimeter support (corners lifting slightly during ramps)
-
Bezel stress feeding air back into the bond line
-
Handling twist—lifting from one corner instead of a flat lift
-
Abrupt ramp-down and release behavior (rebound bubbles)
Fast way to confirm:
-
If edges worsen after handling rather than immediately after processing, it’s usually edge-fed.
Star bubbles with a fixed center point
If there’s a visible dot in the center, that dot is the story. It’s almost always a particle anchor.
Most common causes on the floor:
-
Dust in the adhesive interface
-
Dirty fixture contact zones transferring debris
-
Contaminated wipes / fibers / static-charged hairline lint
Fast way to confirm:
-
Pressure may change reflection, but the dot remains.
Why “good vacuum” still leaves defects
Vacuum lamination removes larger voids and helps wet-out, but micro-air can remain in:
-
Cutouts and tight geometry (OLED cutouts, speaker holes)
-
Corners and edge zones where support isn’t uniform
-
Thickness transitions or textured areas
That’s why post-lamination bubble removal exists: it finishes what vacuum starts and stabilizes the bond line so it stays clean after handling.
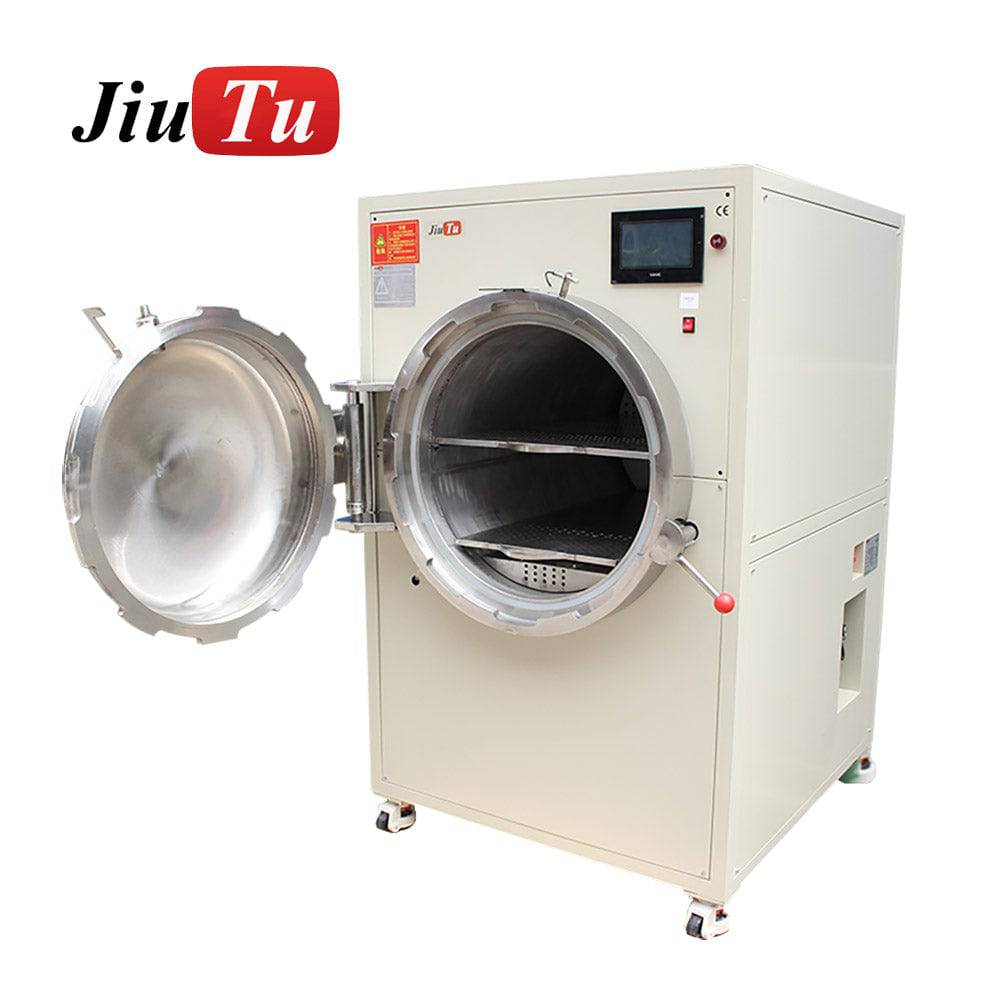
What bubble removal actually does
Post-lamination bubble removal is controlled pressure + gentle heat + time, applied to a laminated stack to collapse trapped air and help adhesive relax into a stable bond line. On the floor, you’ll hear multiple terms for the same finishing step: debubbling, defoaming, autoclave finish, post-lamination bubble removal.
In this guide, “debubbling / defoaming / autoclave finish” refers to the same post-lamination bubble removal step.
What a bubble remover machine can fix (and what it can’t)
Improves:
-
Micro-air clusters that survive vacuum wet-out
-
Edge stability (especially when ramps are controlled)
-
Some haze driven by incomplete wet-out (when upstream is close)
-
Repeatability across shifts (because it’s a controlled finish step)
Doesn’t improve:
-
Misalignment (misalignment remains visible)
-
Particle-anchored dots (the dot stays)
-
Plate scratches, fixture marks, handling damage
-
Upstream contamination (it can hide it temporarily, not solve it)
The calm-ramp principle
It’s tempting to treat the chamber like a brute-force tool: “If bubbles remain, crank it.” In practice, aggressive ramps can trigger edge creep and rebound bubbles. Stable ramps, uniform heat, and disciplined loading usually win.
A good mental model:
-
Vacuum lamination does primary wet-out.
-
Post-lamination bubble removal does stabilization and finishing.
-
Upstream discipline decides whether finishing is predictable or chaotic.
A bubble-free OCA workflow from prep to QC
A stable line is a chain of habits. If one link drifts, the chamber becomes a blame target. The goal is to make the finish step boring: same load, same behavior, same results.
Workflow checklist (shop SOP style)
1) Cleaning and staging
-
Keep a “clean zone” bench that never touches raw parts
-
Use a consistent wipe pattern (don’t scrub randomly)
-
Blow with filtered air, not bench dust
-
Stage cleaned glass face-up in a protected area (not at bench edge)
2) OCA film prep and handling
-
Cut cleanly; avoid jagged corners that become stress points
-
Control peel speed and peel angle (fast peel = static)
-
Keep film flat; don’t bend liners into the adhesive
-
Avoid “pause mid-roll” on larger glass (creates line boundaries)
3) Alignment and pre-press
-
Use the same jig approach every time
-
Confirm corners are seated before committing the roll-down
-
Roll down steadily, one direction, consistent pressure
-
Don’t “re-lift and re-drop” repeatedly (introduces micro-air)
4) Vacuum lamination (primary wet-out)
-
Plates must be clean and flat (this is a yield tool)
-
Use a steady ramp; avoid “snap changes”
-
Hold long enough for wet-out to reach perimeter (especially thick stacks)
5) Post-lamination bubble removal (finish)
-
Load flat, spaced, supported
-
Run controlled pressure/temperature behavior
-
Allow stabilization time before final inspection (don’t rush from hot to backlight)
6) Inspection (make it a routine)
-
Use a fixed scan path: center → corners → edges → cutouts
-
Backlight at two angles (straight-on and slight tilt)
-
Record defect types, not just “pass/fail” (feeds the log)
Two gates that save the most time
Gate A: Pre-check before finishing
If it’s a particle anchor, don’t waste chamber time. If edge lift is severe, fix support/fixture first.
Gate B: Stabilization before final QC
Don’t inspect instantly while the stack is still warm. Let it settle so you don’t chase “moving” edge behavior.
Shop-floor inspection setup (small, but powerful)
If your QC lighting is inconsistent, your yield decisions will be inconsistent. A simple standard helps:
-
One stable backlight source
-
One fixed viewing distance
-
One fixed scan path
-
One rule for what gets reworked vs. what gets run
When the QC station is standardized, recipe tuning becomes quieter and faster.
Recipes that work across screen types
Recipes should match structure, not model names. A short recipe library is more valuable than one “universal” recipe that nobody trusts. Think in lanes: OLED cutouts, flat LCD, thick stacks, large format.
Recipe A: OLED with cutouts and tight corners
Cutouts trap air. Corners flex. This lane rewards patience and support.
-
Upstream focus: slow peel, stable roll-down near cutouts
-
Vacuum focus: support cutout zones; avoid corner float
-
Finish focus: smooth ramps; avoid aggressive changes that cause edge creep
-
QC focus: cutout rings first, then corners, then perimeter
Common failure mode:
-
Cutout ring bubbles that “move around” between checks often trace back to support or handling twist, not lack of pressure.
Recipe B: Tablet LCD with large flat glass
Large flat areas reveal haze under backlight. Uniform wet-out wins.
-
Upstream focus: cleaning discipline and dust staging
-
Vacuum focus: full-area support; avoid plate contamination lines
-
Finish focus: consistent temperature behavior; stable holds
-
QC focus: full-area haze sweep before perimeter details
Common failure mode:
-
Haze zones that mirror plate wear or tray contact points.
Recipe C: Mid-size monitors and kiosk panels
Perimeter stress is the repeat defect here—especially after assembly.
-
Upstream focus: protect long edges; avoid twisting during staging
-
Vacuum focus: perimeter support plates matter more than extra “force”
-
Finish focus: controlled release to avoid rebound edge bubbles
-
QC focus: perimeter first, then bezel zone, then center
Common failure mode:
-
“Returns after assembly” that are actually bezel stress plus weak perimeter support.
Recipe D: Thick glass and industrial stacks
Thick stacks change thermal behavior. The bond line needs time to relax.
-
Upstream focus: confirm stack flatness; avoid mixed thickness in one tray
-
Vacuum focus: allow wet-out time to reach edges (don’t rush)
-
Finish focus: uniform heat + smooth pressure transitions
-
QC focus: edge stability and uniform haze, not just “bubble count”
Common failure mode:
-
Great center clarity but unstable edges, caused by perimeter support and heat behavior.
Recipe E: Large format panels and refurbishment batches
Here, loading layout is everything. Small mistakes scale up fast.
-
Upstream focus: strict spacing rules, no stacking shortcuts
-
Vacuum focus: long-edge support and corner protection
-
Finish focus: consistent tray loading and smooth ramps
-
QC focus: perimeter sweep + wide-area haze scan
For large-format shortlisting, you’ll often compare “regular chambers” vs. OCA bubble remover machine (large-chamber) options—because tray layout and spacing rules become the deciding factor, not just the headline chamber volume.
Recipe logging: the habit that makes results repeatable
Most shops have recipes. They’re just stored in someone’s head, and that doesn’t survive shift changes, new staff, a fresh roll of OCA, or a fixture that slowly drifted out of flat.
A log turns “good days” into repeatable days.
Batch log template (paper or shared sheet)
-
Date / shift
-
Screen structure (OLED cutouts / flat LCD / thick glass / large panel)
-
OCA film batch (new roll or continuing roll)
-
Vacuum lamination recipe name
-
Bubble removal recipe name (pressure profile + temperature + hold time)
-
Fixture / tray ID
-
Result notes (edge line / haze / pepper dots / cutout clusters)
How to use the log without turning it into paperwork
Keep it short enough that people actually fill it, and review it weekly. The weekly review is not a meeting for blame—it’s a five-minute pattern scan:
-
Did a defect spike follow a new OCA roll?
-
Did it correlate with a single fixture ID?
-
Did it begin after a maintenance event, air-line change, or fan noise?
-
Did it appear after a staffing change or training gap?
If a defect spikes, the log helps you correlate it with leaks, fan noise, fixture drift, or line pressure drift—so you fix the cause instead of endlessly tuning cycles.
Recipe governance (the part shops skip)
A practical rule that keeps a station stable:
-
Only one person “owns” recipe edits.
-
Everyone else can propose changes, but changes go through the log.
-
Every recipe change must be recorded with the reason and the result.
That one rule prevents the “three operators, three personal recipes” problem.
Common myths that waste time
Myth 1: “If I see bubbles, I should increase pressure.”
Reality: aggressive ramps can trigger edge creep or rebound bubbles. Stable ramps and uniform heat usually win. Loading layout often fixes more than higher pressure.
Myth 2: “A longer cycle always means a better bond.”
Reality: longer holds can help thick stacks, but can worsen edge flow if fixtures don’t support the perimeter. Support and calm ramps beat “just run longer.”
Myth 3: “Debubbling fixes dust dots.”
Reality: particle-anchored defects need cleaning upgrades or rework—pressure won’t erase a hard speck.
Myth 4: “One recipe covers everything.”
Reality: OLED cutouts and thick glass behave differently. A short structure-based library is easier to train and more stable in production.
Myth 5: “If it passes once, it’s stable.”
Reality: many edge defects are “late.” The real test is stability after handling and assembly steps. That’s why consistent inspection rhythm and stabilization time matter.
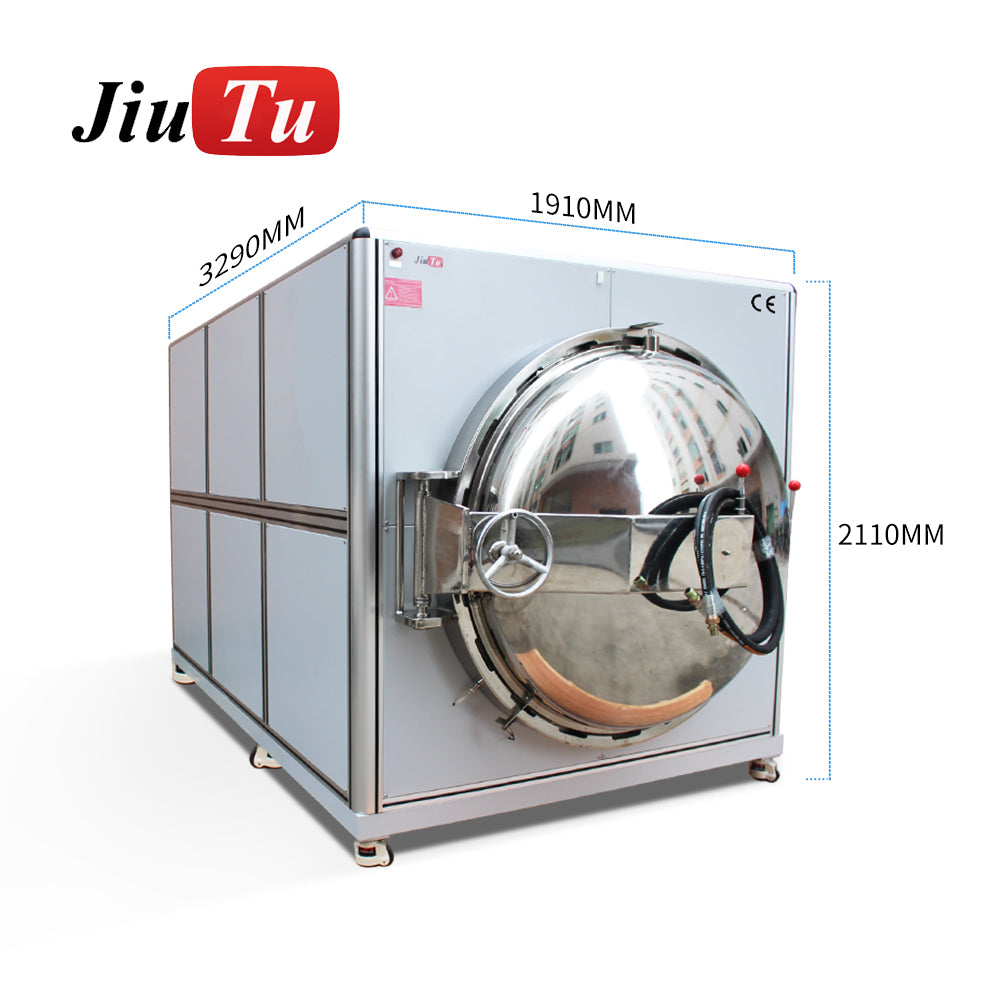
Installation notes: power, air, footprint, and day-one checks
Installation is where stations quietly win or quietly lose. If utilities drift, operators compensate with settings, and then the process becomes “personal style.”
Utilities reality (what matters on day one)
-
Power: some units run on AC220V; larger chambers may require AC380V
-
Air: working ranges vary; stability matters more than chasing a big number
-
Air quality: water traps and dry lines reduce pressure behavior drift
-
Footprint: loading space matters as much as the machine footprint
-
Staging: plan space for hot-to-cool stabilization and inspection lighting
Day-one checks (make them boring)
-
Confirm voltage/plug matches the equipment spec
-
Verify air pressure stability before loading production batches
-
Level the unit; lock casters if present
-
Run an empty cycle first to confirm the pressure/temperature curve is smooth
-
Include temperature stabilization time in planning, not just hold time
-
Define tray spacing rules before the first production batch
That empty-cycle habit catches problems early: unstable curves, door safety behavior, unexpected line drops, or temperature drift that would otherwise show up as “random defects.”
Maintenance rhythm that stays consistent
A practical rhythm many floors use is a 15-working-day check set:
-
Circuit check: look for loose/abnormal wiring
-
Air circuit check: check joints for leakage; repair or replace
-
Fan check: confirm normal behavior; replace if abnormal noise appears
-
Lubrication: apply as required by the mechanism
The line that prevents this from dying on busy weeks:
Assign an owner for the 15-working-day checks and keep the log near the machine.
Pairing logic: vacuum lamination, fixtures, and shared air supply
Pairing decisions usually improve yield faster than tuning.
Pairing 1: Vacuum wet-out + post-lamination finish (the core station)
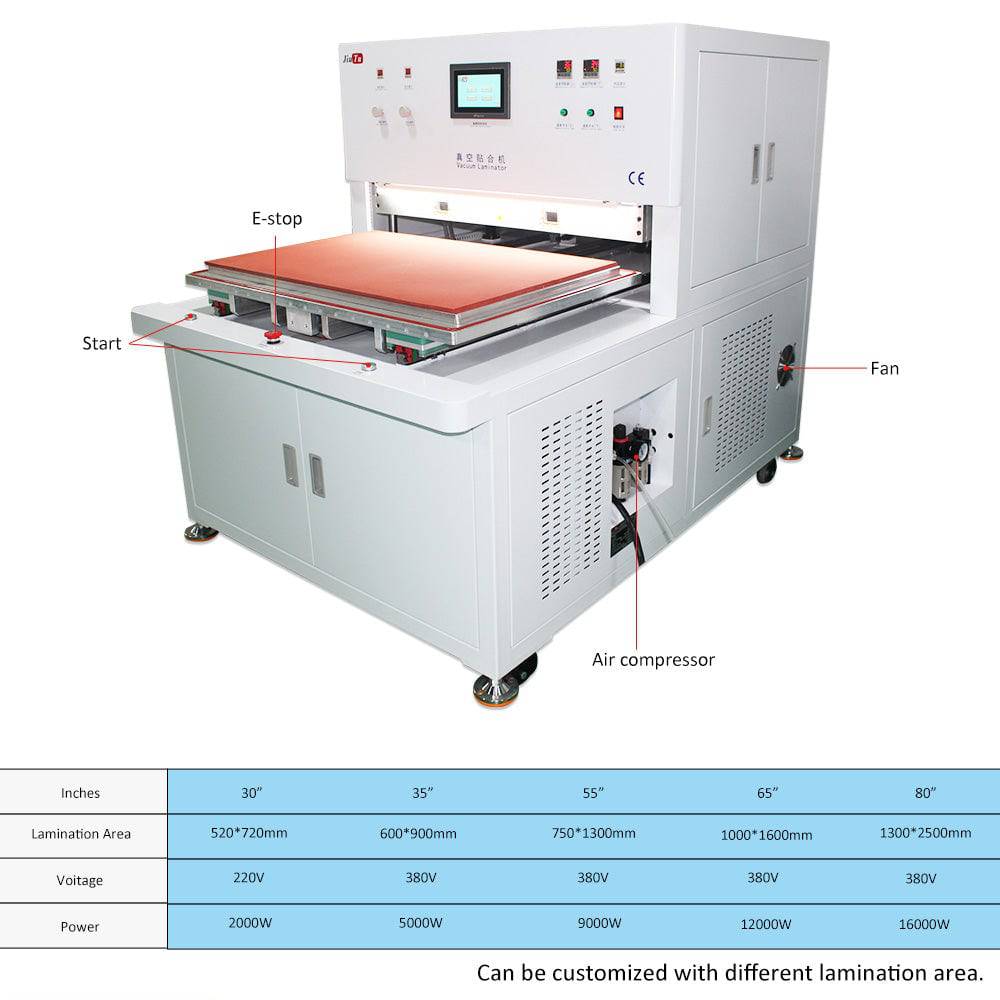
Vacuum does primary wet-out. The finishing step stabilizes micro-air and edges. If your bottleneck is wet-out consistency, pair the finish step with an OCA vacuum laminator that can keep plates clean/flat and hold stable behavior.
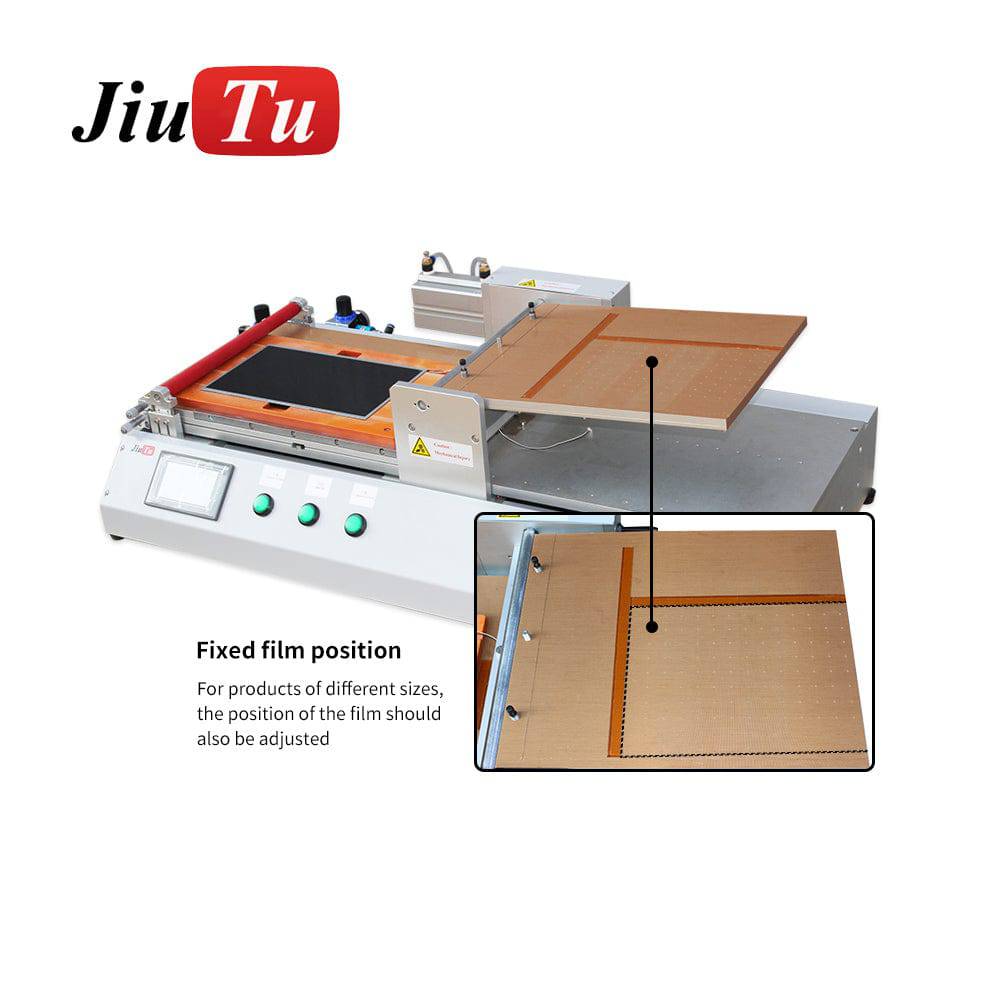
Pairing 2: Film / polarizer tools (upstream stability)
Wrinkles, liner peel habits, and alignment drift create air channels that pressure cannot “erase.” Tight upstream control reduces defects before they become “cycle problems.”
Pairing 3: Shared air supply (budget + layout lever)
A common layout advantage: one compressor supporting multiple tools. It can save budget and simplify station planning—if compressor capacity matches real demand and line pressure doesn’t sag during ramps. The key question isn’t “can it share,” it’s “does it stay stable when both tools are active?”
Pairing 4: Station planning across categories
If you’re building the full station (cleaning, lamination, finishing, trimming), use JiuTu Store collections to navigate equipment groups and design a clean workflow flow: clean → laminate → finish → inspect.
Use cases that benefit most from post-lamination defoaming
Post-lamination bubble removal shows the biggest visible gain where defects hide and where “late returns” are common.
OLED cutouts with frequent model switching
Cutouts and corners trap air. Switching models increases variation—unless recipes are structure-based and logged. In this lane, the finishing step often turns “almost clean” into “clean under backlight.”
Tablets with haze complaints
Haze is diffuse micro-air and wet-out inconsistency. Uniform heat behavior and stable holds usually beat aggressive ramp changes. Upstream cleaning/ESD discipline is still the biggest lever.
Mid-size monitors with edge returns after assembly
Edge bubbles returning after handling are usually perimeter stress, not “bad settings.” Better edge support and controlled ramp-down often outperform “more cycle.”
Industrial stacks under thermal cycling
Here, stability matters as much as clarity. A calm finish helps the bond line survive handling and temperature change without edge lift.
Large format batches
Spacing rules become non-negotiable. When you control tray layout and support, the finishing step becomes predictable instead of a daily guessing game.
Loading and fixture design that prevent edge bubbles
Loading is a process step, not an afterthought. If the loading layout is sloppy, you’ll see “mystery” edge bubbles that come and go.
What stable loading looks like
-
Flat support plates (clean, scratch-free)
-
Consistent spacing between panels (no pressure shadows)
-
Corner and long-edge support (especially for thin structures)
-
No mixing extreme thickness differences in one tray layout
-
Tray IDs recorded in the batch log
What causes repeat defects
-
Warped trays (same corner defect, same tray every time)
-
Stacking without designed supports
-
Debris under plates (creates pressure points and haze lines)
-
Rushed unload while the stack is still heat-soft
-
Handling twist (lifting from one corner)
Fixture “现场感” tips that actually matter
-
Corner support often beats “more center pressure”
-
Cutout-zone support reduces cutout ring bubbles on OLED jobs
-
Long-edge support is usually the main fix for kiosk/monitor edge returns
-
Treat fixtures like tools, not accessories—dirty fixtures behave like dirty plates
A quick reality check:
If the same corner fails across different recipes, stop touching settings and inspect trays, plates, and handling.
Cleaning, ESD control, and film handling that reduce microbubbles
Microbubbles are often born upstream. If your upstream is noisy, the finishing step turns into a lottery.
Cleaning rhythm that stays consistent
-
Use a repeatable wipe pattern (same direction, same pressure)
-
Replace wipes on schedule, not when they “look dirty”
-
Don’t blow bench dust across cleaned glass
-
Stage cleaned parts in a protected area (not open bench edge)
ESD control that reduces dust attraction
-
Grounded mats in the film handling zone
-
Reduce plastic friction near the peel area
-
Ionizing airflow helps in dry environments
-
Slower peel reduces static generation more than people expect
Film handling habits that prevent channels
-
Peel liners at a consistent angle and speed
-
Roll down steadily; avoid pausing mid-roll on large glass
-
Avoid repeated re-lift/re-drop adjustments
-
Keep OCA flat; don’t “bow” the liner into the adhesive
A simple “contamination audit” when pepper dots spike
When pepper dots spike suddenly, don’t start by tuning cycles. Audit:
-
wipes (are they shedding?)
-
airflow (is it filtered or bench dust?)
-
staging (are cleaned parts exposed?)
-
peel habits (did someone switch to fast peel?)
-
gloves/mats (new batch, different lint behavior?)
This is where logs pay off: they show what changed.
Troubleshooting when bubbles persist
Troubleshooting should be pattern-driven, not mood-driven. Start with one question:
Is it particle-anchored, edge-fed, or wet-out related?
Why do bubbles come back after debubbling?
Most “comeback” issues are edge-fed: perimeter lift, bezel stress, handling twist, or abrupt release behavior.
Checks:
-
Do bubbles grow after handling/assembly rather than immediately?
-
Are they concentrated at the same edges/corners?
-
Does the log show correlation with a fixture ID?
Fix direction:
-
Improve perimeter support and handling discipline
-
Smooth ramp-down and release behavior
-
Add stabilization time before inspection
Can a bubble remover machine remove dust dots?
If the defect is particle-anchored, the dot stays. Pressure may change reflection, but it won’t erase a hard speck.
Checks:
-
Look for a fixed dot under angled light
-
Compare dot location patterns across panels (same bench area = contamination source)
Fix direction:
-
Strengthen cleaning/ESD control
-
Add a pre-check gate and rework particle-anchored defects
What should I check first: fixtures or settings?
Rule of thumb:
-
Same corner/edge repeats → fixtures, trays, plates, handling
-
Random distribution → cleaning, ESD, wet-out consistency, temperature stability
Why does haze show up instead of obvious bubbles?
Haze is diffuse micro-air or incomplete wet-out. Plate flatness, support uniformity, and stabilization time matter.
Checks:
-
Does haze mirror tray contact zones?
-
Is plate wear visible?
-
Are you counting stabilization time, not only hold time?
Fix direction:
-
Refresh plates or correct support issues
-
Calm ramps and improve uniform heat behavior
-
Fix upstream wet-out consistency before touching finish behavior
A practical stop-rule (so you don’t tune forever)
If you’ve changed a recipe twice and the defect pattern doesn’t change, stop tuning and audit:
-
plates and tray flatness
-
fixture cleanliness
-
air-line stability
-
peel and staging habits
-
maintenance drift (fan noise, leaks)
Stable lines tune less because they drift less.
Buying checklist: choosing capacity without overbuying
Buying the right setup starts with reality:
-
what sizes show up weekly
-
daily batch count
-
how much changeover happens per shift
-
whether power/air are stable and sized correctly
-
whether you have staging space (cooling + inspection + handling)
A fast way to frame selection is lane-based planning.
Lane comparison table (no pricing, just what matters)
| Lane | Typical work | Suggested chamber focus | Utilities notes | Changeover priority |
|---|---|---|---|---|
| Phones / small tablets | High mix, many models | Stability + fast handling | Easier footprint; focus on air stability | Very high (quick switching) |
| Mid-size displays | Moderate mix, steady throughput | Tray area + perimeter support | Plan steady air supply; staging space matters | Medium (batch-oriented) |
| Large format | Spacing rules dominate | Usable tray area + uniform heat | Utilities and floor space become critical | Lower (batches, fewer models) |
What matters most when comparing options
-
Usable tray area over headline chamber volume
-
Control stability over extreme specs
-
Station layout (staging + inspection + handling) over “fits anywhere”
-
Maintenance accessibility so drift doesn’t become “random defects”
A practical way to avoid overspending is to shortlist from the lane you actually run. If you’re shortlisting chamber sizes, start from the bubble remover machine collection and filter by your real panel sizes and tray layout needs.
The three questions that prevent mis-buying
-
What’s the largest panel that shows up monthly (not yearly)?
-
What tray layout do you want to run without stacking shortcuts?
-
Can your site support the required power and stable air behavior consistently?
If you answer those three, most buying decisions become obvious.
FAQ: bubble-free OCA lamination and debubbling
(Formatted for easy FAQ schema later.)
Q: Why do bubbles show up after vacuum lamination?
A: Vacuum removes larger voids well, but micro-air can remain around cutouts, corners, and edge zones—especially when support isn’t uniform or film handling introduces micro-channels.
Q: Why do bubbles come back after debubbling?
A: Edge-fed bubbles often return after handling or assembly due to perimeter lift, bezel stress, or abrupt ramp-down behavior. Focus on edge support and controlled release.
Q: Can a bubble remover machine remove dust dots?
A: No—particle-anchored dots remain. Pressure can change reflection, but it won’t erase a hard speck. Fix upstream cleaning/ESD and rework particle-anchored defects.
Q: What should I check first: fixtures or settings?
A: If the defect repeats in the same corner, check fixtures first. If defects are random across the surface, check cleaning rhythm, ESD control, plate condition, and temperature stability.
Q: What pressure/temperature should I start with for OLED cutouts?
A: Start with calm ramps, uniform heat behavior, and strong corner/cutout support. Exact values depend on adhesive, thickness, and fixtures—structure-based recipes are safer than universal numbers.
Q: Why do pepper dots appear even after cleaning?
A: Static can attract dust after cleaning, and airflow can redeposit particles during staging. Slow peel, grounded mats, and protected staging usually reduce this quickly.
Q: Why does haze appear instead of clear bubbles?
A: Haze is diffuse micro-air or incomplete wet-out. Plate flatness, uniform support, and stabilization time often matter more than “more pressure.”
Q: Is a shared compressor layout realistic?
A: Yes, if compressor capacity matches real demand and line pressure stays stable during ramps. Water traps and dry lines help maintain consistent behavior.
Q: What’s the difference between “debubbling” and “autoclave finish”?
A: In most shop contexts they refer to the same post-lamination bubble removal step (pressure + gentle heat + time).
Q: How many recipes should a station keep?
A: Keep a small library grouped by structure: OLED cutouts, flat LCD, thick stacks, large format. That’s usually enough for repeatability without confusion.
Summary and next steps
Stable optical bonding comes from removing drift, not chasing settings. Vacuum lamination builds primary wet-out. Post-lamination finishing locks clarity and edge stability when loading and upstream habits are controlled. Logging makes defect spikes explainable instead of mysterious.
Next steps (light CTA, not hard-sell):
-
If you’re shortlisting chamber sizes, start from the bubble remover machine collection and match it to your lane (phones / mid-size / large format).
-
If your bottleneck is wet-out consistency, pair the finish step with an OCA vacuum laminators upstream behavior stays stable.
When the station is disciplined, the finishing step becomes predictable—and a bubble remover machine becomes a controlled production step that keeps backlight results clean across shifts.