A panel can look quiet under bench light and turn honest five minutes later under backlight. That is why lcd bubble issues feel more frustrating than they should. The visible mark usually appears after the real mistake has already happened. Maybe the surface looked clean enough. Maybe one side touched down too early. Maybe the part moved to the next stage before the bond had settled. By the time the defect becomes obvious, the process is already asking for a second guess.
This version keeps the article practical. Less machine-catalog language, more real bench judgment. The useful questions are not abstract. What does the defect actually look like in the hand? When does it appear? Does it stay sharp, or soften after a short rest? Does the same corner keep failing? Those small clues matter because they tell the difference between contamination, trapped air, weak support, and a workflow that is asking one machine to fix a problem created somewhere else.
How this defect usually shows up
The reason post-lamination bubbles feel random is simple: the panel rarely fails in front of the eye at the exact second the process drifts. A small mistake happens early and stays quiet for a while. Then the screen gets tilted under a stronger lamp, or the backlight comes on, and a faint silver line shows up near the edge. In another case, the centre looks fine while the panel is still warm, then two pale dots appear after cooling.
That timing matters. A defect that appears right away does not usually belong to the same cause family as one that shows up later. One is often about the active step. The other is often about an unstable result that only looked good too early. On a busy day, that difference is easy to miss because the bench wants to keep moving.
This is also why stronger settings become such a tempting shortcut. When a defect appears, the fast reaction is usually “run it again, but harder.” That feels productive. It often is not. A calmer read of the symptom usually saves more time than a blind rerun.
Why the symptom matters more than the first guess
Most wasted rework starts the same way: settings first, diagnosis second. A better order is shape, location, timing, then action. The shape tells whether the defect looks like a dot, a soft patch, a long air line, or a corner wedge. The location tells whether it belongs to the centre, the border, a cut-out area, or one repeated corner. The timing tells whether it appears immediately, after cooling, or only under stronger inspection.
Once those three clues are read together, the process becomes less mysterious. A hard bright dot often points toward contamination or poor surface prep. A soft crescent near the edge often points toward support, laydown rhythm, or first contact on one side. A long silver line usually means air had a path and kept it. A late-return defect often means the panel was accepted too soon.
| What the panel looks like | What it often means | Best first move |
|---|---|---|
| Tiny bright dots in the centre | Contamination or weak initial wet-out | Check whether the dots stay fixed under repeat inspection |
| Soft crescent near an edge | Weak support or early one-side contact | Inspect support and laydown before changing the cycle |
| Long silver line | Trapped air path from rushed peel or placement | Review the bonding step, not only debubbling |
| Bubble cluster near a cut-out | Geometry trapping air locally | Check local support and placement direction |
| Looks clear warm, doubtful after cooling | False pass or unstable bond | Add a short rest before making changes |
What readers usually want to know first
“Is this a machine problem or a workflow problem?” On many benches, it starts as a workflow problem. The machine matters, but the panel usually tells the truth before the settings page does.
The habit that catches the most false passes
Inspect twice. Once while the part is fresh, then again after a short cooling pause. That second look catches more weak results than most people expect.
12 root causes worth checking first
The list below is written for real bench use. Not every defect arrives as a perfect textbook case. Sometimes the clue is only a repeated corner, a line that mirrors peel direction, or a panel that looks different after it sits quietly for a few minutes. The point is not to over-explain the problem. It is to narrow the next move quickly.
- 1) Dust or fibre trapped in the bond Sharp, fixed dots that stay in the same place under repeat inspection often belong here. If the mark behaves more like a speck than a soft void, look at cleaning first.
- 2) Thin residue left on the surface Some panels look clean but are not truly ready. Light residue near the border or around openings can weaken wet-out and create repeat defects that seem small at first, then keep coming back.
- 3) Liner removal that is too fast A rushed peel can create air paths in a second or two. If the defect shape seems to follow the peel direction, slow that human step before touching the machine recipe.
- 4) First contact happening too early on one side When one side lands first, the remaining air gets fewer escape paths. Soft border crescents often start here, especially when the stack is almost level but not quite.
- 5) Weak support under one corner or edge A corner that keeps failing in the same place is not bad luck. It usually points toward support, fixture wear, or small placement stress that repeats from job to job.
- 6) Air hiding around cut-outs and sensor areas Speaker holes, camera windows, and narrow geometry changes interrupt smooth pressure transfer. Bubble clusters near these features usually need calmer handling, not just more force.
- 7) No quiet rest between stages When the panel moves too quickly from bonding to debubbling, the stack may never get a calm moment to settle. A short pause often tells the truth more clearly than a second run.
- 8) Expecting the debubble stage to rescue a poor bond A bubble remover is a finisher, not a miracle tool. If the bond arrived with trapped channels, weak first contact, or contamination, the chamber may flatten the look without solving the cause.
- 9) Too much faith in stronger settings More heat or more pressure can change the shape of the defect without removing it. If the result looks good hot and doubtful later, the process probably needs a better earlier step, not a harsher later one.
- 10) A setup that technically fits but feels cramped If loading always feels tight and larger panels demand extra caution before the cycle even starts, the workflow may already be operating with too little margin.
- 11) A workload that has quietly shifted to bigger or mixed-format screens A line that once handled mostly phones may now see tablets, notebooks, car displays, or industrial panels. When the screen mix changes, the old setup can stay “possible” long after it stops feeling comfortable.
- 12) Slow maintenance drift Some causes are boring and important. Air-path issues, wear, or a machine that simply feels less predictable across the week can make a familiar recipe behave like a new problem.

Judgment tricks that save time
Useful judgment does not need to be complicated. It needs to be repeatable. A few calm habits are enough to prevent a doubtful panel from becoming an unnecessary rerun.
Start with the same inspection order every time: corners, borders, then centre. That stops the eye from wandering casually. Next, change the viewing condition. Tilt the panel. Use a stronger lamp. Check under backlight when relevant. A defect that looks harmless in ordinary light often reveals its real nature under a less flattering angle.
One more small trick helps a lot: when a defect looks annoying, do not ask “How do I get rid of this fast?” Ask “Which step is this panel trying to blame?” That question slows the urge to overreact and makes the next decision more useful.
Quick judgment checklist
- Did the mark stay sharp and fixed, or soften after a short rest?
- Is it really in the centre, or slightly biased toward one edge?
- Does the line mirror peel direction or placement direction?
- Did the same corner or border family appear on the last similar job?
- Did the part look worse after cooling than it did while warm?
- Did the previous rerun solve the issue, or only change its shape?
A calmer workflow for lcd bubble removing
Most readers are not looking for another answer that says “adjust the machine and try again.” What they usually need is a more believable daily rhythm. One that still makes sense when the queue is real and the result has to hold up after cooling, not just for the first thirty seconds.
- Read the panel before loading. Take a proper look, not a rushed glance. Use the same inspection order every time so repeat patterns do not get missed.
- Check whether the part feels physically calm. If the stack sits awkwardly or always makes handling feel tense, the process is already short on margin before the cycle begins.
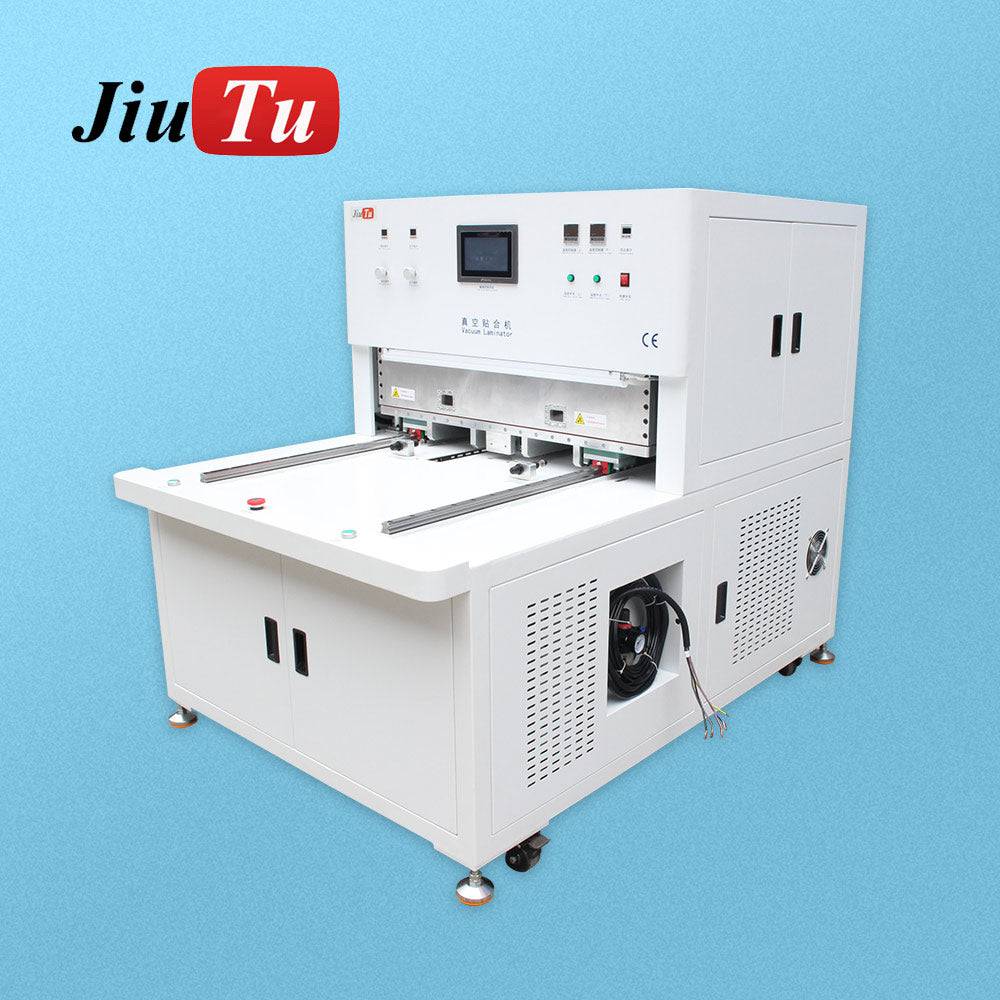
- Respect the first bond. A stable OCA Film Laminating Machine matters most when the goal is cleaner first contact, better support, and less trapped air upstream.
- Do not rush the handoff. A short quiet pause between steps often reveals whether the panel is truly stable or only looks promising too early.
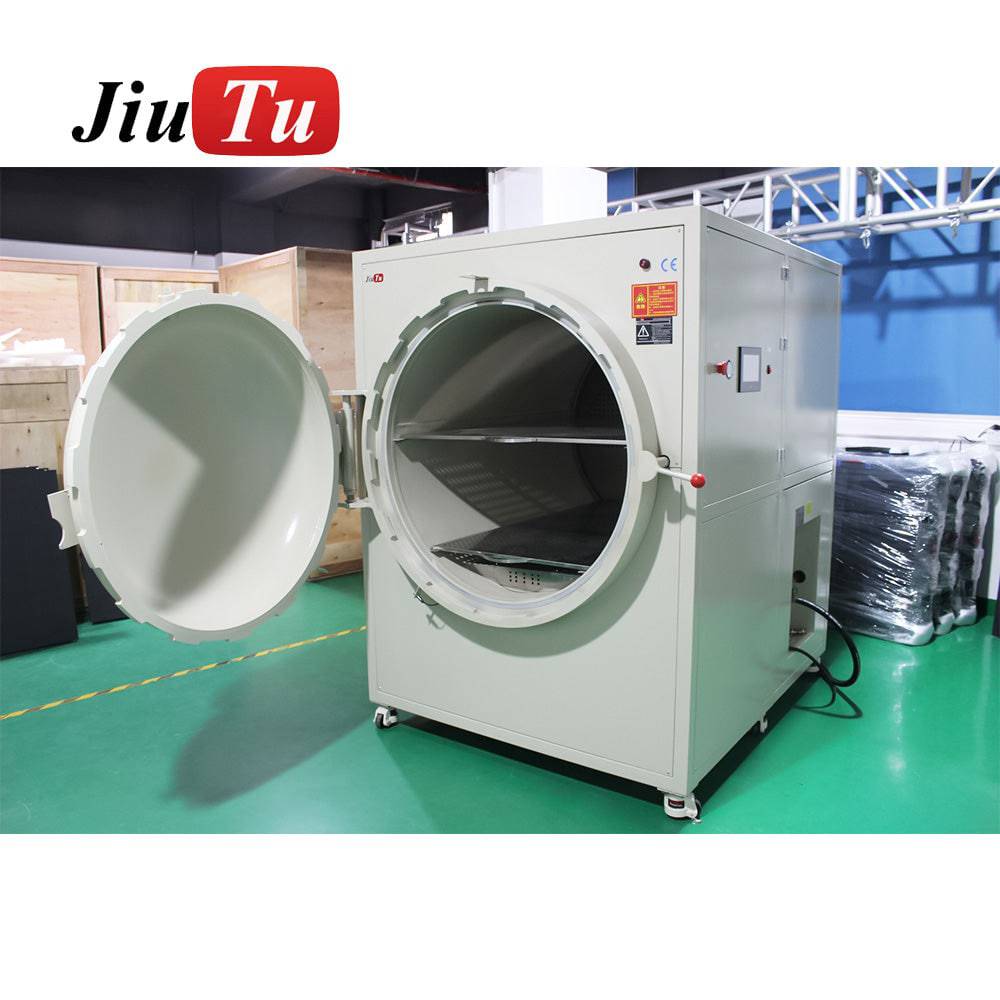
- Use the debubble stage as a finisher. The OCA bubble remover machine makes the most sense when the bond is already close and the remaining task is residual air removal.
- Match the machine to the daily screen mix. Once the work moves toward wider panels or industrial modules, a roomier LCD bubble remover machine often improves consistency simply because loading and support stop feeling cramped.
- Judge the result twice. One look immediately after the cycle, one look after a short cooling pause. That second look saves a surprising amount of rework.
The reason this workflow works is simple. It treats the panel as a sequence, not a single moment. A clean-looking screen is not always a stable screen. A vanished bubble is not always a solved cause. A faster line is not always a better line if it keeps creating extra work later in the day.
When a better machine fit helps
Not every repeat bubble problem means new hardware is necessary. Plenty of lines improve with better cleaning, steadier handling, and more honest inspection. Still, there is a point where the workflow itself starts asking for more room or a better match.
That point usually sounds familiar: larger screens always feel awkward to load, edge trouble rises with panel size, and reruns start feeling routine rather than exceptional. When that happens, the question is no longer “Can the current setup still do it?” The better question is “Does the current setup still do it comfortably?”
That comfort matters more than it sounds. A machine that technically fits the part is not always a machine that gives the process enough daily margin. In practice, better fit often means fewer doubtful reruns, calmer handling, and more predictable results across the week.

Current setup is probably enough when…
Most trouble is contamination-related, repeated location defects are rare, and the regular screen sizes still feel calm rather than cramped on the bench.
A better fit starts helping when…
Larger panels always feel cautious to load, edge trouble rises with size, and the line depends on reruns more often than anyone likes to admit.
Three practical actions for the next shift
- Inspect twice, not once. First right after the cycle, then again after a short cooling pause.
- Slow the human motion before changing the recipe. Better placement and calmer handling usually solve more than a harsher rerun.
- Trust repeated patterns. If the same corner or border family keeps speaking up, believe it and inspect that stage honestly.
FAQ
What causes lcd bubble after lamination most often?
Usually not one dramatic mistake. More often it is a small drift in cleaning, liner handling, first contact, support, or the handoff between stages. The symptom shape normally narrows the answer faster than a rushed settings change does.
Is lcd bubble removing mainly a chamber issue?
Usually no. The chamber matters, but many repeat defects begin earlier. A debubble stage helps finish a decent bond. It does not fully rewrite contamination, trapped channels, or weak first contact.
Why does the panel sometimes look clear first and fail later?
Because a warm part can flatter the result. A weak bubble or unstable bond may look better for a short time, then become visible after cooling. That is why a second inspection after a short pause matters so much.
How can contamination and trapped air be judged more quickly?
A contamination point often stays sharp and fixed under repeat inspection. Trapped air usually looks softer and more responsive to light angle or rest. The useful clue is not only what the mark looks like, but how it behaves.
When does a larger lcd bubble remover machine become the better choice?
It starts making more sense when panel size keeps pushing the workflow into awkward loading, narrow support margin, repeat edge trouble, or too many routine reruns. At that point, better fit matters as much as raw capability.
Not sure which setup fits your screen repair work?
If recurring lcd bubble issues are slowing down the bench, the real fix is often a better machine match, not another blind rerun. Jiutu can help compare lamination and debubbling options based on actual screen size, daily workload, and the kind of defects that keep coming back.
A more suitable setup usually means fewer repeat bubbles, steadier handling, and less time lost between lamination and debubbling.
Popular paths: OCA Film Laminating Machine · OCA Bubble Remover Machine · LCD Bubble Remover Machine